If you’re over the minimalist black and white theme that’s been trending in children’s bedrooms recently, you might like to consider something entirely different, inspired by magical worlds and fairytales.
That’s where children’s brand Forivor comes in. The innovative London brand has launched a collection of luxuriously soft organic children’s bedding, adorned in whimsical story-telling illustrations.
All Forivor’s bedlinen is presented in this organic Forivor Suitcase emblazoned with their crest.
Forivor’s super-soft duvets and blankets are reversible, featuring a richly detailed illustration by Forivor’s Alice Ross on each side. Each duvet or blanket is accompanied by a set of illustrated Character Cards, encouraging children to explore and understand the world around them and inspire magical bedtime storytelling.
One side of the bedding depicts a British woodland, where wildlife hides in the undergrowth and up in the branches of the trees for children to find. The other side reveals a transformed nighttime world, where glow worms light up the enchanted forest and fantastical creatures play in secret burrows underground.
The accompanying Character Cards provide interesting facts about wildlife on one side, and the creatures of Forivorland on the other. Storytelling cues and questions encourage children to create their own bedtime tales.
Forivor’s Toddler Character Cards accompany each quilted blanket.
Detail of the Enchanted Forest design showing Cassius the Badger playing the drums. Photo by Lark Rise Pictures for Forivor.
The brainchild of Hackney-based creatives Rebecca Attwood and Alice Ross, Forivor’s children’s bedding collection is launching from a hugely successful Kickstarter campaign, which reached its target in less than 24 hours.
Right now, you can pick up a duvet set or quilted blanket at an exclusive Kickstarter price of £110. Each duvet or blanket comes with the accompanying set of Junior or Baby character cards, and is available via Forivor’s Kickstarter page until 19 July 2016.
Here are just some of the slightly weird and fairly wonderful things that have been collected over the years by my family during the ’60s and ’70s.
This rather motley collection of miniature vintage plastic toys had been kept in an old orange ice-cream container for over 40 years, and it had been long forgotten when I rescued it from the back of the wardrobe when I moved out of home around 20 years ago.
Being a nostalgic soul with an eye for retro plastic treasure, I squirreled it away in a box with my other childhood toys, and some choice items have only recently found a new home in my five-year-old son’s room.
The toys have fairly non-specific origins, but mum does remember buying the tiny figurines when my family was living in the UK at various times in the ’60s and ’70s. Some toys may have been prizes from cereal boxes, Christmas crackers or lucky dips.
My favourites? The Kiss comb, obviously. And the dinky souvenir camera has always been very special.
So here I am on day two of the school holidays. We’ve already seen Finding Dory, we’ve made plans to visit various galleries and museums, and we’ve lined up a series of play dates. Still, the inevitable lament of ‘what can I plaaaaaaay?’ looms large in our household. And here in Sydney, it looks like we’re in for a bit of rain.
In search of inspiration and a back-up plan, I headed straight to my favourite kids’ craft blogs and came up trumps with some fresh and fun new activities.
Here, I’ve picked 12 of my favourite new kids craft ideas. These are the kind of projects I love sharing with my son, as they inspire all manner of creative play. Are you ready to unleash your own inner child? Let’s get started…
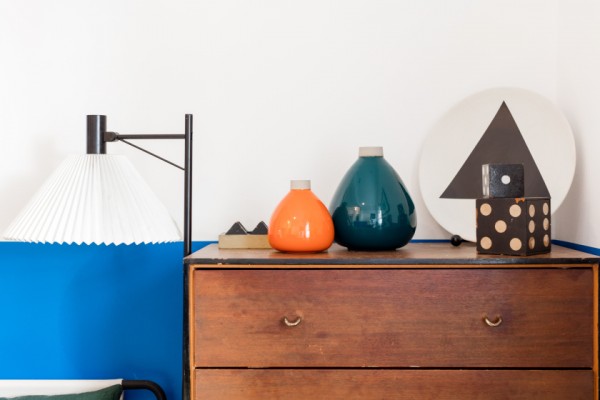
Today I’m taking a look around the London apartment of interior designer Rhonda Drakeford. The Trouva ambassador and co-founder of cult homewares store, Darkroom, is obsessed with monochrome palettes, bold geo patterns and bright pops of colour, which are played out to brilliant effect throughout her Hackney home.
Here, I’ve picked out five clever ideas from Rhonda’s home to inspire you when decorating your own space.
1. Create your own plant wall
Rhonda put up some white shelves against a large window in her living room, which provides both a sense of privacy and a home for her plants, while allowing plenty of light.
In your own home, consider mixing plants in black pots with a few of your favourite bright and colourful objects and vases.
2. Add pops of colour to a monochrome palette
A mostly monochrome palette is used as a visual anchor throughout Rhonda’s apartment, but she’s worked in bright pops of colour and pattern to clash against her bold use of black.
Rhonda’s collection of African wax fabrics in “completely bonkers patterns and clashing colour palettes” inspires her own interior product designs.
3. Paint the floor black
Rhonda painted the floor in her apartment black because she’s “always needed to have some black to anchor any décor”. In your own home, create a sense of lightness and contrast by painting the walls white.
“I am quite obsessed with the use of black in interiors and that came from another favourite place of mine — Lanzarote.”
“It’s a volcanic island and in the 1960s a local architect called Cesar Manrique built some amazing buildings right in the lava bubbles. I think black is such a powerful backdrop to art and furniture,” she says.
4. Paint a bold block colour panel on your walls
Be brave and paint half of your wall in a bright and bold colour to personalise your space. In Rhonda’s bedroom, a blue painted panel is inspired by the alleyways in Essaoueria, Morroco.
“Most of the exterior walls there have a strip of colour at the bottom and I really like how invigorating it feels to be immersed in colour at every turn,” she says.
5. Create a bold pattern on your outdoor walls
Rhonda had extended the interior monochrome theme in her London apartment to the outdoor space by painting the walls in a large-scale geo pattern.
Use simple geo shapes to create your own outdoor mural. You could borrow Rhonda’s black and white colour scheme, or use a primary colour with white to create a sense of drama. Have a look at post-modern art for inspiration.
Rhonda’s outdoor mural was inspired by the village of the Ndebele people in South Africa, where “the women of the village paint bold, bright patterns on the outsides of their homes, a tradition that has gone on for many centuries and is steeped in symbolism – it’s completely mind-blowing.”
Love Rhonda’s look? She’s wearing OTHER Shop and you can shop from the boutique on Trouvahere.
Darkroom‘s London store has now sadly closed, and the online store is currently on hiatus. I’m looking forward to seeing what Darkroom does next, and wish both Rhonda and Lulu all the very best.
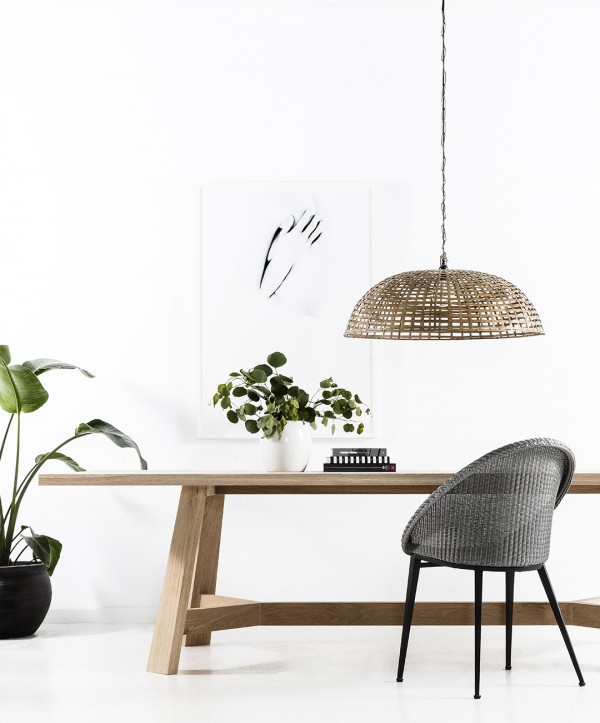
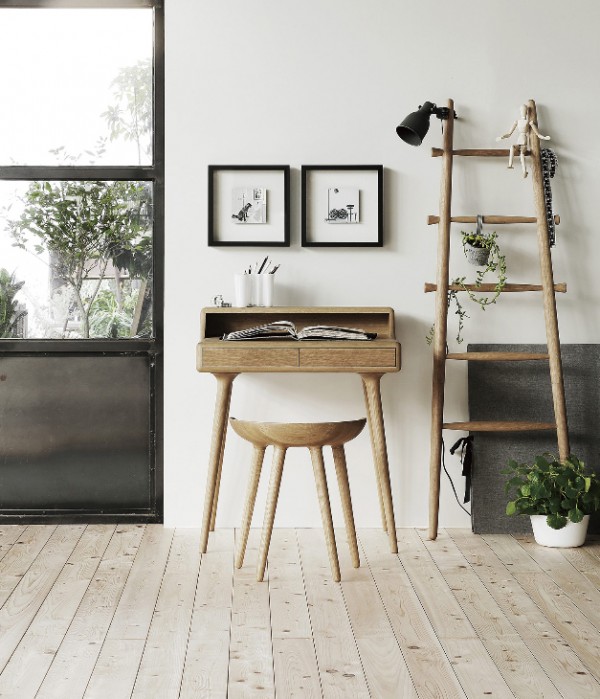
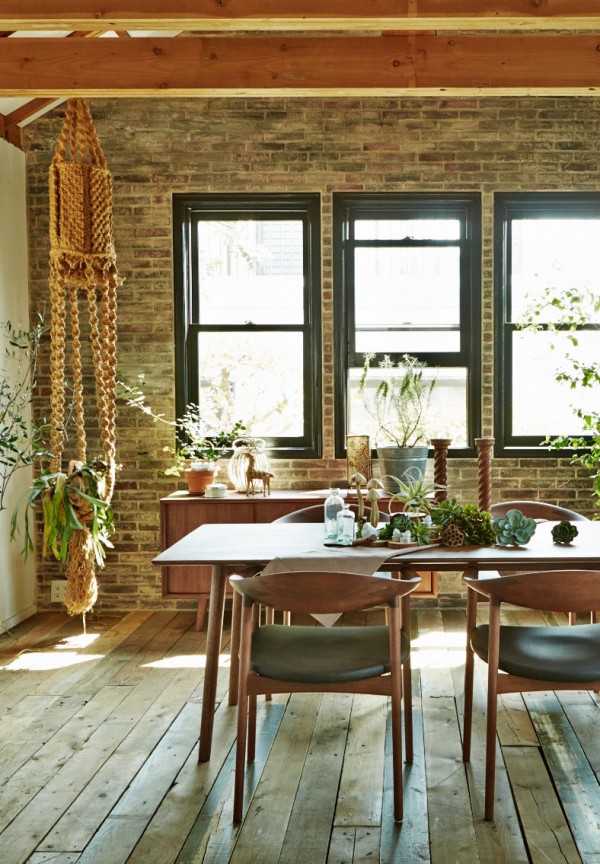
Here at Scout we often get asked about how to create a warm, Scandinavian look in your home without appearing too cliched or obvious.
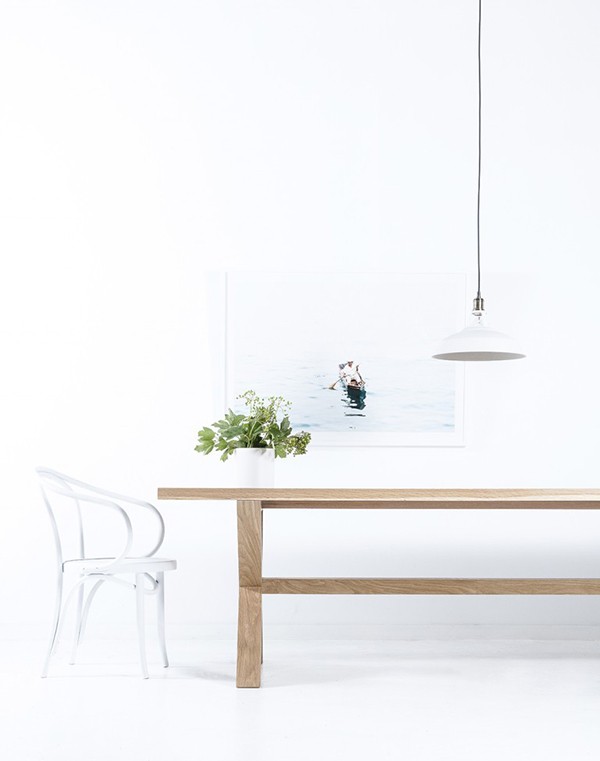
One mistake we’ve seen time and again is a room filled with all-replica furniture, with no sense of personality or layers of style. A good rule of thumb is to always choose at least one hero piece of timber furniture for each room – the best you can afford. An original Scandi design might sound the easiest solution, but those pieces can be expensive and beyond most people’s budgets.
A good solution is to go for a beautiful, custom handmade piece of furniture by local craftspeople, and that’s where The Wood Room comes in. Established on Sydney’s northern beaches by owners Simon and Kate in 2012, The Wood Room creates beautifully-made minimalist furniture with clean lines that’s also competitively priced.
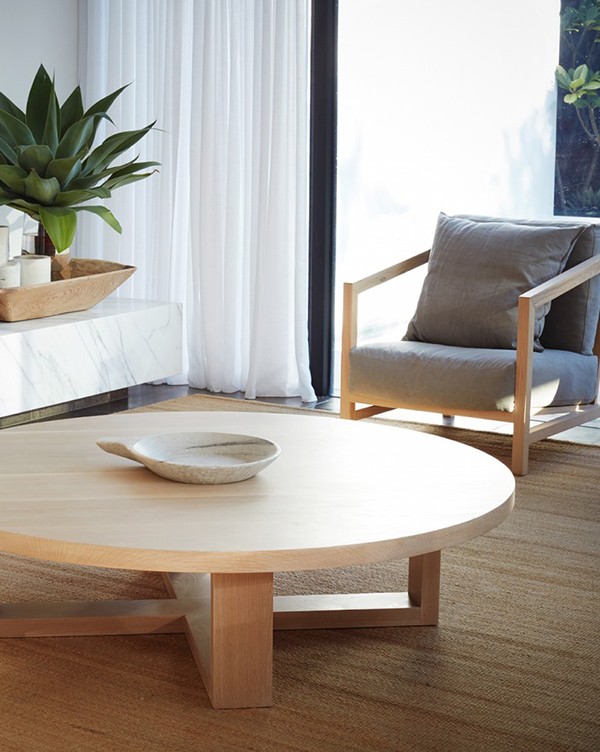
Their signature style is an ‘untreated’ finish that enhances the natural state of the timber they use. And it’s that perfectly imperfect finish of the unique wood grain that brings a sense of Scandinavian-style warmth (otherwise known as ‘hygge’) to any room in your home.
The Wood Room’s finish is created by hand-buffing and applying high quality oils, lacquers and wood washes to achieve that ‘untreated’ look.
Prices start at $1,900 for the small Orbit coffee table, and go to $5150 for the large Tripod coffee table.
For more information, head to The Wood Room, and contact them to visit their Brookvale showroom. Follow The Wood Room on Facebook and Instagram.
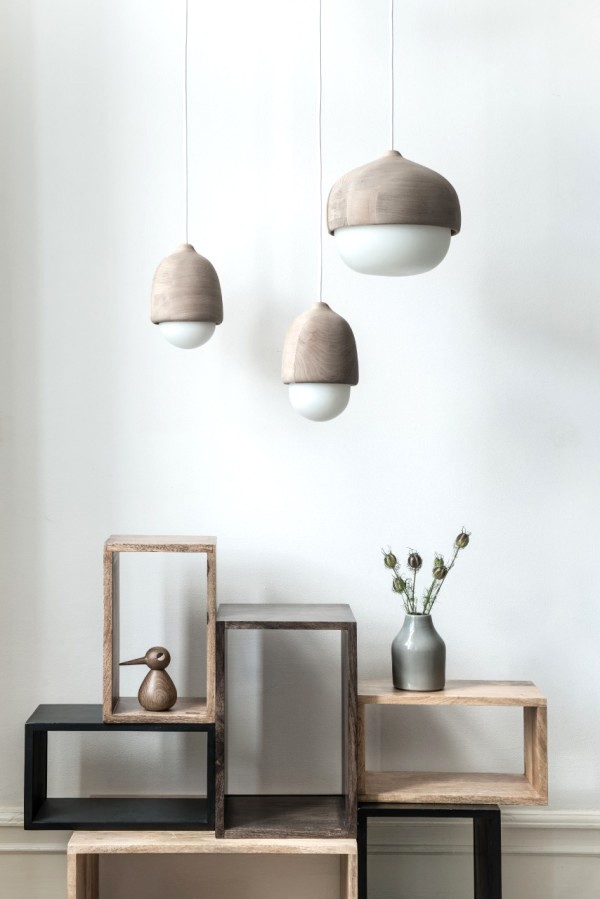
Can’t get enough of Scandinavian design? You might know your Georg Jensen from your Arne Jacobsen, but there is a plethora of contemporary and emerging Danish design brands that aren’t as prolific in Australia. And they’re brilliant. Here are my top five contemporary Scandi names you need to know about.
Based in Copenhagen, Moebe is the brainchild of cabinetmaker Anders Thams and architects Nicholas Oldroyd and Martin D. Christensen. Moebe’s designs are thoughtful and minimalist “essentials” for the home, such as frames, tables and mirrors which have been “reduced to their most simple forms”.
Founded in Denmark by Henrik Marstrand in 2006, Mater collaborates with new and emerging designers to produce high end furniture and lighting which supports people, local craft traditions and the environment.
Hans Sandgren Jakobsen designs furniture that follows in the Scandinavian tradition of combining innovation, aesthetics and functionality. His work focuses on the exploring the raw material’s full potential.
The result of a collaboration between Danish architect Dorte Kjettrup and Danish designer Susanne Holmvang, Piece of Denmark creates vessels in porcelain and glass. The handmade porcelain vase designs GUBEL and QUEEN are limited editions, inspired by origami.
Founded in 2015, Design by Dane is all about minimalism, functionality and quality. There is a strong focus on creating designs that are ‘made to last’, using only quality materials, including oak and handmade glass.
It’s little wonder that the Hamptons-style beach house is a look that’s popular in Australia. The classic light and breezy style is perfect for our climate, open-plan homes and coastal living. But it’s a look that can very easily succumb to tired seaside motifs and cliches. So how do you create a fresh beach house with a refined look?
Enter architect Daniel Raymond, and the Pittwater home he renovated for his parents. Working alongside builder Michael Steedman, he’s designed a home that’s a perfectly modern Australian take on the Hamptons beach house.
Photos (top and above) by Simon Whitbread
Thanks to Sheridan, I was recently invited by Inside Out magazine for an exclusive bloggers’ tour of Dan’s family home in Palm Beach (Sydney’s answer to the Hamptons).
Inside Out’s editor-in-chief Claire Bradley and interior architect (and winner of The Block) Shannon Vos were our tour guides, sharing their their knowledge and showing us exactly how this elegant home works as a masterful renovation.
Open for Inspection with Inside Out magazine. Oh, and The Block winner Shannon Voss and me.
So what exactly makes this home a stand-out renovation? Here are my highlights from the tour:
Open kitchen and living space
This large living and entertaining space extends to the outdoor deck, making the view of Pittwater the absolute hero and focal point – a living, breathing artwork. However, the living room’s new raked ceiling almost steals the show, with graphic black truss details contrasting with the fresh white paint.
Relaxed living on the deck.
Warmth and character
In terms of scale, this home was almost a total rebuild, and yet Dan created a sense of warmth by using a clever mix of materials and texture throughout the home. A luxe marble benchtop in the kitchen is warmed by the American Oak flooring, which is used extensively throughout the home.
Clever hidden storage
Behind the kitchen wall is a long storage room with open shelves – perfect for hiding all the mess when entertaining. A hidden attic space also offers extra space for storage – or it could be used as play room for the grandchildren.
The attic. Photography by Simon Whitbread, styling by Maria Dyon.
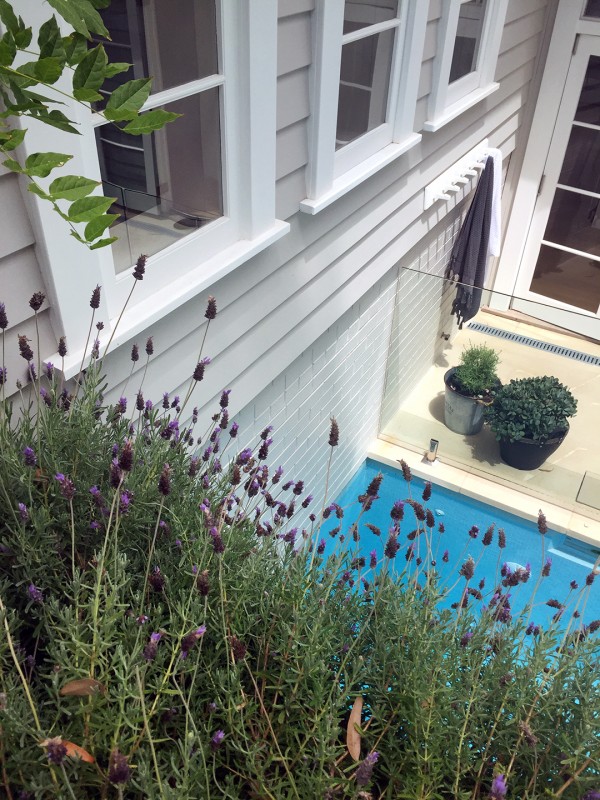
Plunge pool
A door just off the kitchen leads to an unexpected space featuring a bijou pool. Who doesn’t love a home with a surprise element?
Master bedroom
In a brave and bold move, the small bedroom features shutters which open up to look out directly on Pittwater. Claire explained that on the whole, she’s seeing smaller bedrooms with people putting space into the living room. There is a an option to close the shutters if the couple have guests.
The master bedroom – a medley of neutral textures. Photography by Simon Whitbread, styling by Maria Dyon.
Clever use of lighting
Shannon was impressed by the masterful use of lighting throughout the home, especially the moody and minimal lighting in the living room. Instead of using obvious and harsh down lighting, the upwards-facing sconces showcase the incredible ceiling, while also referring light down.
Wide hallway
Another brave move in this home is the relatively wide hallway. While it may sacrifice space in other rooms, the stairs and hallway in American oak create a dramatic symmetry and offers a horizon view of Pittwater.
Layers of texture
One way to add instant character to a new build is to create layers of interest with texture. Take the guest bedrooms, for example, which feature a beautiful mix of neutral tones and textures in Sheridan bedding to reflect the beach house style.
Guest bedroom for grandchildren.
Photography by Simon Whitbread (as captioned), styling by Maria Dyoniziak. All other photography by Rebecca Lowrey Boyd for We Are Scout.
Thank you Inside Out and Sheridan for inviting me to Open for Inspection.
Get the full story – and more pics and details – in the March 2016 issue of Inside Out, on sale now.
Want to come on our tour with Claire and Shannon? Watch the video here (and yes, that is me gawping open-mouthed at the ceiling).
For more on Dan’s work, visit danielraymond.co. To contact Michael Steedman Constructions, email michaelsteedmanconstructions@live.com.au.
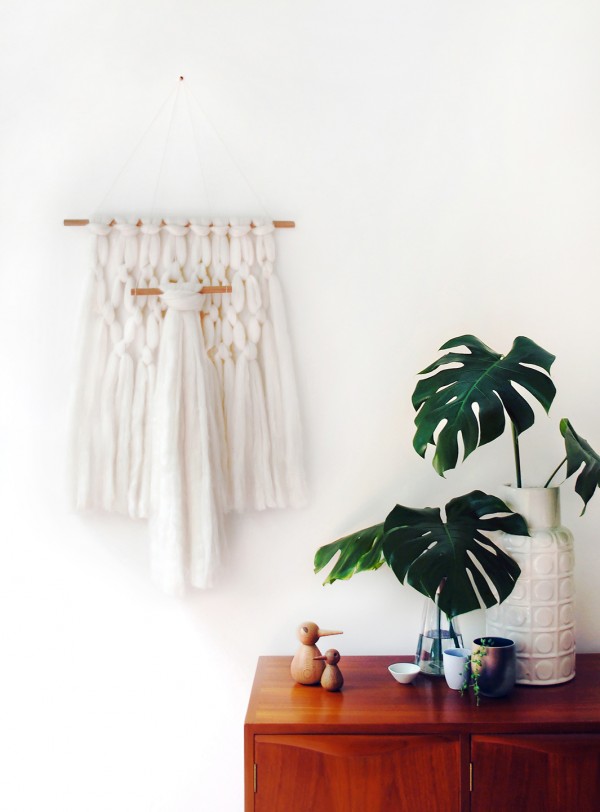
After a fast and simple way to make your own modern wall hanging? I made this Scandi-inpsired, modern wall hanging for Rebecca, using 100 per cent organic Australian Merino wool roving. It involves just a few simple knots and it can be whipped up in half an hour.
It’s an easy way a beautiful statement artwork for your home, which is striking in its simplicity and purity of the fibre. Doesn’t it look fabulous hanging above Rebecca’s mid-century sideboard?
Materials
1 metre of Tasmanian oak dowel cut into two pieces: 50cm and 22cm in length (I got mine at Bunnings and they cut it for me too.)
Wool roving (I bought 50g of organic Australian Merino wool roving from Ecoyarns and it comes in one continuous piece. I have some left over from this wall hanging, which I’ll use for another crafty project.)
Sharp scissors
Embroidery thread in a natural colour
Let’s Get Started
1. Cut three 190cm lengths from your continuous piece of wool roving.
2. Gently pull apart each length of wool roving so you have three pieces equal in width.
3. Take one length and fold it in half.
4. Lay the folded length on your work surface over the longest piece of dowel and then bring the loop up and over the top. Pull the tails through the loop and pull tight. You’re effectively making a Lark’s Head Knot.
5. Repeat with the other seven pieces of wool until you have eight Lark’s Head Knots along the length of dowel. Don’t worry for now if the ends aren’t completely even – we’ll trim them later.
6. Cut a length of embroidery thread to 85cm and tie to each end of the dowel. Tuck the knot behind the wool so you can’t see it. At this point in the project, it’s easier to work if you can hang up your wall hanging at an accessible height.
7. Starting at the left, take strands one and two and then make a knot (cross left over right and pull left through the hole) about 7cm down from your first row of knots. Then cross the right piece over the left and pull the right piece through the hole to make another knot.
8. Repeat this simple knotting process with strands three and four, and continue knotting across the length of dowel.
9. For your next row, make another row of simple knots, but this time start with pieces two and three. Continue to the end. The first and last strand will be hanging unknotted.
10. Now make another row of the same knots, starting with pieces three and four. Continue for another five knots, giving you a total of six knots for the row. There will be two strands unknotted at either end. You’ve now completed your knots for the long piece of dowel. Trim the bottom of wool roving strands to make a straight line.
11. Take the smaller piece of dowel. Cut of piece of wool roving (not divided) to a length of around 150cm and make one big Lark’s Head Knot in the centre of the dowel. Trim the bottom width of wool roving so it’s a sharp straight line.
12. Now take 110cm of embroidery floss and tie to each end of the small length of dowel.
Hang the smaller length of dowel from the same hook as the longer length of dowel. It should be centred on top of the big piece of wool and hang just under second row of knots.
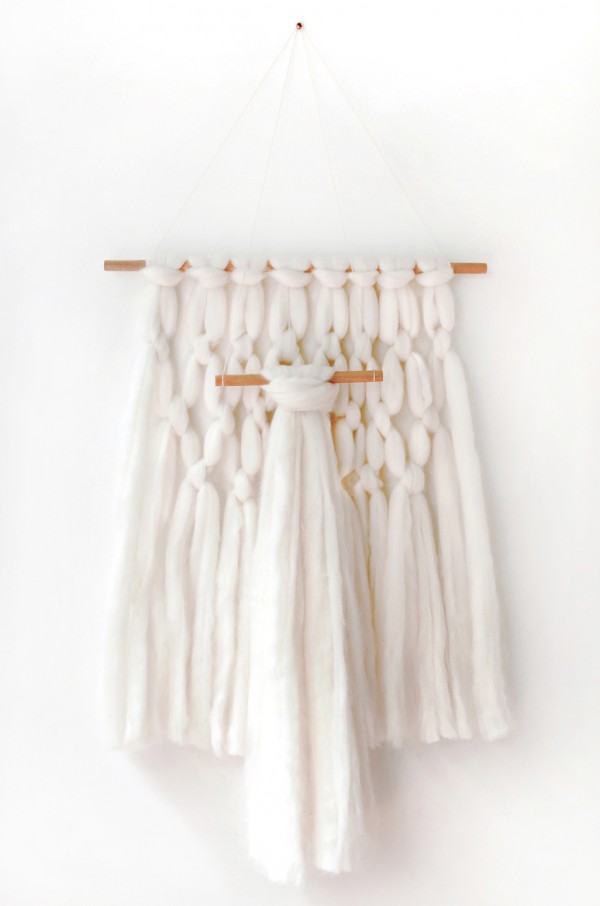
That’s it. Your beautiful new modern wool wall hanging is complete.
Tutorial by Lisa Tilse. All photography and styling by Lisa Tilse for We Are Scout.
This post was originally published on We Are Scout.
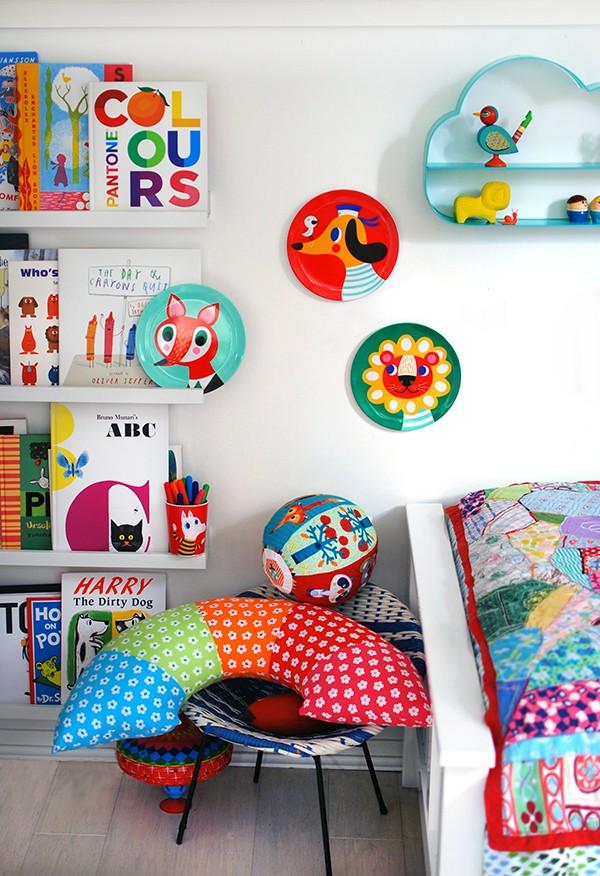
I recently gave my four-year-old’s room a quick and easy mini makeover and I thought you might like to have a peek. It’s amazing how just a few new items have transformed the blank white walls next to Harry’s bed, and created a bright and cosy new reading nook.
First, I made use of wall space and created a vertical reading nook with IKEA’s picture ledges. At around $8 each, they make excellent open shelving and as they display the covers of Harry’s books – many of which are beautifully designed and illustrated – it makes for a bright and colourful wall of art.
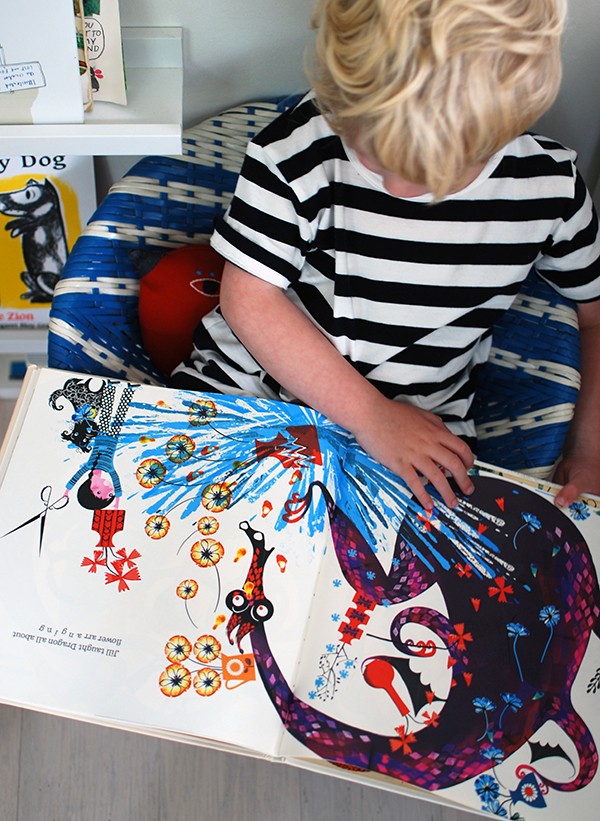
The shelves run all the way down to the floor, which means that Harry can easily access his books himself. I completed the reading nook with a vintage ’50s child’s saucer chair.
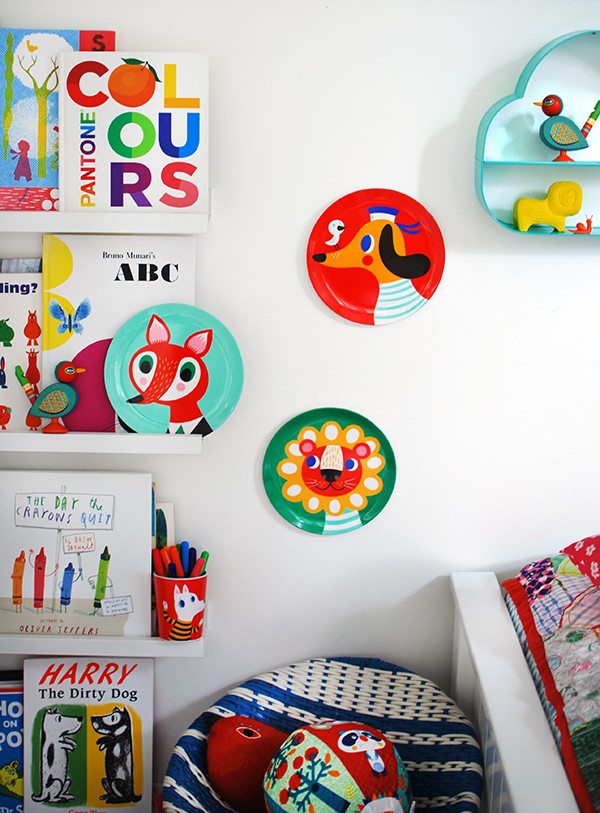
Next, I used three melanine plates designed by Helen Dardik from Little Citizens Boutique as little artworks for his wall. The plates are light and easy to mount with 3M removeable velcro tape, and the illustrations are too gorgeous to hide away in kitchen drawers. There are also matching melamine cups, which are perfect for a bedside cup of water or for storing pencils and textas.
I also like adding round shapes to a wall, as it breaks up all of the vertical and horizontal lines in a room.
At just AU$13.58 a plate, they make affordable artworks for a children’s room or playroom, and there is a wide selection of designs available at Little Citizens Boutique (which has free shipping within the UK and extremely reasonable worldwide rates). They’d make a fantastic Christmas present for the favourite little person in your life.
Djeco’s Animambo bird whistle and Pop Forest Balloon make fun and playful additions to the new nook, are they’re also from Little Citizens Boutique. (By the way, the Pop Forest Balloon is a fantastic indoor ball!)
Harry enjoying his new reading nook, with Lesley Barnes’ new book, Jill & Dragon.
Finally, I added two sets of cloud wall shelves from Kmart. At $12 each they’re an absolute bargain, and the simple design makes a graphic statement on the wall. I just removed the rope straps and hung them on nails on the wall. They’re very handy for displaying little figurines and collections.
That’s it – a gorgeous new look for a kid’s room on a budget – and it fits in perfectly with the room’s bright and cheery mix-and-match theme. I love it. And so does Harry.
Disclosure: The gorgeous Helen Dardik plates, cup, bird whistle and ball were gifted by Little Citizens Boutique. Everything else was purchased myself. Content and concept, product selections, words and opinions are all our own.
Photography and styling by Lisa Tilse for We Are Scout.
This post was originally published on We Are Scout.
Feel like getting a bit crafty for Christmas this year? We’ve scouted 22 of the best Christmas crafts from our favourite bloggers, as well as a few of our own Christmas projects from previous years.
Fancy making a pair of figgy pudding flat shoes? Or decorating your front door – or garage – with a super sized snowflake? ‘Course you do. Let’s get started.
Here’s a fun project that Lisa and I recently worked on together with leading specialty paint brand, White Knight. We took a tired old doll house and turned it into a contemporary Scandi-style summer house – with a roof that doubles as a chalkboard!
White Knight Paints has recently launched #WhiteKnightRevive – a series of online videos designed to inspire DIYers to tackle their own at-home projects and renovations.
Teaming up with professional DIY specialist, Natasha Dickins, White Knight has created nine short how-to videos, featuring projects such as a bathroom makeover and fence fix-up, as well as inspirational ideas like turning shelves into a doll house.
Read on for our own step-by-step tutorial, which shows you how to paint a doll house and furnish it with your own handmade homewares, live indoor plants, and repurposed objects.
Before
I found the doll house on the side of the road. It was in poor condition with a tired lime green and red colour scheme and varnished timber shelves, but it had potential.
It sat – mostly ignored – in the corner of our spare room for months, filled with a jumble of mis-matched furniture I had picked up at charity shops.
Before: Tired, dated and a bit blah.
After
Inspired by Swedish summer houses, we used #WhiteKnightRevive paints to transform the doll house into a gender-neutral Scandinavian-style house, with a matte black exterior and modern, bright interior. We used a colour palette of charcoal, white, dove grey and blue.
After: A contemporary Scandi-style summer house. Who wants to move in?
Come on a tour with us around our revived Scandi doll house!
We used White Knight Chalkboard Paint to revive the exterior and roof – great texture for getting that matte black Scandi summerhouse look, while adding an extra dimension for creative play. The White Knight Splashes paint in Gloss White made a striking contrast on the inner edges of the sky light and windows.The living room, revived with White Knight Splashes in Charcoal on walls and floor; and White Knight Splashes in Gloss White on the ceiling, features a woven wall hanging, crochet rug and statement pendant light. The fireplace is revived with White Knight Splashes in Gloss White.
The master bedroom, revived with White Knight Splashes in Dusk Grey on the walls; Ming Blue on the ceiling and Gloss White on the floor, features an upholstered linen bedhead, chunky knit throw and woolen floor rug.A corner of the light and bright kitchen, painted entirely in White Knight Splashes in Gloss White.The dining area, painted with White Knight Splashes in Charcoal on the floors and wall, and White Knight Splashes in Gloss White on the ceiling.The children’s bedroom, with White Knight Splashes in Ming Blue on the wall, and White Knight Splashes in Gloss White on the floor, features a handmade crochet rug and pom pom ottoman.The ensuite bathroom is revived with White Knight Splashes in Dusk Grey on the walls, Ming Blue on the ceiling and Gloss White on the floor.
1. First, make sure the surface of the doll house is perfectly clean before you start work. The timber surface on my doll house had old chipped paint, dust and varnish, so I first cleaned it with sugar soap, before giving it a good sand all over.
2. Smooth any bumps with Spakfiller. My doll house had obviously been very much loved, as there were loads of holes and knicks in the timber to fill. Follow the instructions on the Spakfiller, allow to dry, and then sand back to a smooth surface.
3. Give the surface a good dust with a microfibre cloth.
4. Cover all surfaces you don’t want painted with a drop sheet and newspaper, then apply a layer White Knight Rust Guard All Purpose Primer to the surface of the doll house. Make sure you do this in a well ventilated area, and wear a dust mask if necessary.
5. Apply a second coat after one hour. This acts as an undercoat for your paint. Take care to ensure all surfaces are covered, including up under the eaves and tops and bottoms of windows and doors.
Prepare for painting first coat
Mask off any areas you don’t want painted with Painter’s Masking Tape. I started with the roof of my doll house, so I taped the inner edges of the skylight, which would later be painted in a contrasting gloss white.
Paint the Roof in Black Chalkboard Paint
1. First, stir the White Knight Chalkboard Paint with a broad, flat stirrer in a circular lifting motion for at least five minutes before painting. This will ensure the paint is well mixed and you won’t get a streaky application. At this point, you might like to slip on a pair of rubber gloves, unless you want to turn yourself into a human chalkboard (however, you can remove the paint from your skin with turps).
2. Apply the first coat in a well-ventilated area (or outside, like I did) using a 25mm brush.
3. Apply the second coat after six hours. If it’s humid or raining, you may need more drying time between coats.
Paint the Interior of the Doll House
1. Work out a colour palette for the doll house, and plan where the colours are going.
We used the following colours for each room:
Master bedroom and ensuite (top level): White Knight Splashes Water-based Enamel Paint in Gloss White for floor; Dusk Grey for walls; Gloss White for inner edge of sky light; and Ming Blue for ceiling.
Living and dining (middle level): White Knight Splashes Water-based Enamel Paint in Charcoal for floor and walls; and Gloss White for inner edge of the window and ceiling.
Kitchen (left, lower level): White Knight Splashes Water-based Enamel Paint in Gloss White for floor, walls and ceiling; and Ming Blue for door.
Children’s bedroom (right, lower level): White Knight Splashes Water-based Enamel Paint in Gloss White for floor and ceiling; and Ming Blue for walls and door.
2. Stir or shake the can of Splashes paint thoroughly before use.
3. When painting, use long smooth brush stokes in the same direction, and do the lightest colours first.
4. Use a small angled brush for cutting in the edges of the walls in different colours, and tape off the other edge.
5. Leave the first coat to dry for at least two hours before applying the second coat.
Why no, I don’t have a particularly hairy arm. My husband helped out with the second coat!
Decorate the Interior
This is where Lisa stepped in and sorted through the jumble of doll house furniture I had thrifted over the years.
She revived the existing wooden furniture by painting over the old colours with White Knight Splashes Water-based Enamel Paint in Gloss White, and left some natural timber exposed for that signature Scandi look.
Before: the doll house furniture needed to be revived with a lick of White Gloss paint.
Miniature Interior Plants
We decided we wanted to make indoor plants a major feature in our doll house, which has been one of 2015’s biggest interiors trends (and one of our favourite topics this year).
I scoured the plumbing section of hardware stores and craft shops for things I could re-purpose as miniature on-trend vessels. I used copper capillary end caps and coupling and white plastic caps for copper vases and round white planters.
I found some tiny glass bottles in the craft section of a discount shop and used them as glass demi johns.
Filling a plastic end cap with potting mix and a terrarium plant. Skewers and spoons come in handy here!Here, plastic plumbing caps are planted with Fittonia Starlight (left) and a Parlour Palm (right). I also printed out a miniature version of Inside Out magazine for the coffee table.I planted Fittonia Starlight in tiny glass bottles for an on-trend demi john look.
For the miniature plants, I headed to the terrarium section of my local nursery, and selected hardy plants with tiny leaves. Keep an eye out for the range of “Bottle Babies” Terrarium Plants by Paradisia. I used Sedum Little Missy succulents; Ficus pumila variegata; Fittonia Starlight; Peperomia prostrata; and Parlour Palm, which is one of the smallest species of palm trees.
All of these plants survive well under low light, making them ideal for use in a doll house. Because you’re dealing with small vessels, use tiny pebbles at the bottom for draining, followed by a layer of charcoal to keep the soil ‘sweet’, with potting mix on top.
Carefully divide up the plants, ensuring you keep the root ball attached. Use a skewer or toothpick to plant them in the tiny vessels, and top up with more potting mix.
If you look after your doll house plants, keeping the soil moist and out of direct light, they should last for quite a while! It’s a bit fiddly but loads of fun, and adds a fresh, on-trend detail to your doll house.
Here, we filled a 20mm copper capillary coupling with some flowers for the dining table. The Parlour Palm in the background is planted in a plastic plumbing cap.
DIY Doll house Decor
Look around for things that will translate to the small scale of your doll house. You can also make a lot of your own furniture and homewares for your doll house. It will add a playful level of detail, and save you loads by avoiding expensive shop-bought doll house accessories.
Here are some of things you can re-purpose or make by hand for your doll house:
For the front door, use a round cork coaster and cut it in half. Lisa wrote ‘Welcome’ on ours in her signature calligraphy style.
Use a cork coaster for a low-lying coffee table. Simply cut out pieces and join them together with glue.
Small fabric offcuts make good floor mats in the kitchen.
Crochet your own rugs. Lisa made rugs for our living room, master bedroom and kid’s bedroom. Look at magazines and at interiors blogs (like ours!) and and see what’s around and replicate them in miniature.
Gift tags and greeting cards are the perfect size for wall art.
Make a miniature woven wall hanging by using a matchbox as the loom.
Wooden toy blocks can be repurposed as bedside tables.
Use a tiny white Christmas bauble as a hanging pendant light, like we did in the master bedroom.
Get some air-dry clay and make your own pendant light by creating a simple pinch pot, topped with a wooden bead. Suspend it from the ceiling on twine, a small length of chain, or leather cord.
Make a mirror for the bathroom vanity by repurposing a silver foil Christmas gift tag.
Use the caps of acorns as miniature organic-style textured bowls.
Small pieces of fabric go a long way. In the master bedroom, Lisa wrapped a piece of cardboard in linen and secured with double-sided tape to make a headboard for the bed. She added upholstery details with tiny cross stitches in natural thread.
The bed cover features torn and frayed edges, so there was no need to sew hems.
For pillowcases, Lisa made use of the frayed selvedge of the linen fabric and hand stitched along the edge as a feature. She folded in the outside edges and secured them with double-sided tape.
Lisa filled the pillows with soft toy filling, but you could make do with cotton balls. She closed the ends with small hand stitches, but for a quick and easy no-sew option, just close with double-sided tape.
Pieces of foam were used for the mattress, wrapped with co-ordinating print fabric. So sweet!
In the children’s room, Lisa used a gift tag as wall art. House-shaped make-up sponges make cute little doll houses-within-a-doll house.Lisa hand-made a crochet piece for a lovely mandala on the dining room wall. In the dining room buffet, we placed the cork lids from the tiny glass bottles on the shelves, along with the cap of an acorn, which doubled as a gorgeous organic-style bowl.
In the living room, Lisa made the sofa upholstery in the same way as the pillows for the bedroom. The tiny cushions on the sofa are made from white felt and stitched with black embroidery floss.
Ready for play!
That’s it! Your revived doll house is complete and ready for play! Check out #WhiteKnightRevive’s video tutorial for turning shelves into a dollhouse below.
Disclosure: This is a sponsored post in collaboration with White Knight. We only partner with brands that are a good fit with our blog, our aesthetic and what you, our readers, enjoy. Content and concept, product selections, words and opinions are all our own.
Tutorial by Lisa Tilse and Rebecca Lowrey Boyd. All photography and styling by Lisa Tilse for We Are Scout.
This post was originally published on We Are Scout.
Mixed metallics have emerged as a major trend in interiors, design and fashion this year, so Rebecca and I were inspired to show you how to decorate your Christmas table with a gleaming gold theme, accompanied with hints of copper and bronze and a mix of modern and vintage decor.
We kept the look fresh with lots of white and greenery – and added Ferrero Rocher for an extra special festive treat for your guests.
Let’s get started.
First, establish your table’s theme by laying a tablecloth with gold accents on your table, like my white tablecloth with gold polka dots.
Next, create your own ‘festive runner’ down the centre of the table with a line of glass cloches filled with gold baubles, sprigs of fresh holly and loose Ferrero Rochers. We used my collection of vintage glass cloches, placing the biggest one in the centre.
I carefully piled a selection of gold baubles, including gold and brown acorns, which reflect the colours of Ferrero Rocher, on top of each other, adding a sprig of holly and a handful of loose Ferrero Rochers until it reached the top of the large glass cloche. Then we filled the smaller cloches with a similar mix of items, for a total of six glass cloches on the table.
Complete your runner by scattering sprigs of fresh green spruce, loose Ferrero Rochers and more gold baubles. Keep the look relaxed and fill empty spaces with baubles and greenery as necessary. Finally, add some white pillar candles for extra glow – it will reflect the glittering baubles and gleaming gold wrappers of the Ferrero Rochers.
Now create your individual place settings. We used my plain white tableware, and gold cutlery to co-ordinate with the gold theme. Gold-rimmed Champagne glasses and my Mum’s vintage frosted Iitala water tumblers add extra shine and texture – I always love to mix and match.
Place a white linen napkin on each bread and butter plate, and pop your own handmade Ferrero-filled Christmas cracker on top. We followed the instructions in this Ferrero Rocher bon bon step-by-step video tutorial, using white paper and a strip of gold mesh ribbon wrapped around the body of each cracker. We finished each one with a sprig of fresh green spruce to tie in with the greenery in the table setting. You could also add a tag with each person’s name.
A special Ferrero Grand Rocher on each dinner plate creates an extra treat for your guests – and a visual style bomb! We placed a one in the centre of each plate – they’re new and look so impressive on the table. Each larger-than-life Ferrero Rocher features a thick milk chocolate shell with hazelnut pieces, along with four classic pralines hidden inside.
Paper origami leaves complete the place settings, using a mix of gold, copper, glittery and bronze papers. You’ll find the step-by-step tutorial for making them in a future post, so keep an eye out for it. Place four leaves in different shades around one side of each Ferrero Grand, finishing with a couple of sprigs of spruce for a fresh look. Stunning!
We love the idea of making our Christmas table extra-special for our guests, with lots of luxe treats and surprises. To tie in with our gleaming gold theme, we added edible 24ct gold sprinkles to each glass of Champagne for an opulent Christmas toast. You can also tear small pieces from a sheet of gold leaf. Make sure you use food-safe 24 c gold leaf or sprinkles of the highest quality.
Serve your guests gold-flecked Ferrrero chocolate cupcakes with their coffee at the end of dinner. Dusted with flecks of gold powder, these chocolatey treats complete your gold-themed Ferrero Christmas dinner. We’ll share Rebecca’s indulgent festive cupcake recipe next week.
The Grand Ferrero Rocher (240g), $17.99; and Classic Ferrero Rocher, $18.99 a box (375g), are available now from Woolworths and Coles.
You can also find step-by-step video tutorials for Ferrero Rocher Christmas craft, including the Bon Bons we used for our table, at the following links:
Disclosure: This is a sponsored post in collaboration with Ferrero Rocher. We only partner with brands that are a good fit with our blog, our aesthetic and what you, our readers, enjoy. Content and concept, product selections, words and opinions are all our own.
Tutorial by Lisa Tilse and Rebecca Lowrey Boyd. All photography and styling by Lisa Tilse for We Are Scout.
This post was originally published on We Are Scout.
Here’s a special curated gift guide for you today, which we have produced for one of our all-time favourite online destinations for presents. Our mission, courtesy of Etsy, was to curate a selection of our favourite “meaningful gifts”. And what a delightful mission it was, too!
After all, we think Etsy is the best online marketplace for buying unique and meaningful gifts directly from local makers, designers and curators. We love shopping on Etsy because we get to buy handmade, while supporting creative individuals and small businesses. If you want something special, one-of-a-kind, custom-made or personalised, Etsy is your best bet for nailing that perfect gift.
This Christmas, Etsy Australia’s community of makers, designers and curators have joined forces for the #makeforgood initiative, and create a silver lining for young girls living in poverty. At least 20% of the value of each item featured in the #makeforgood collection will be donated to Because I Am A Girl, a Plan International initiative.
We were inspired by our theme of “meaningful gifts” to include some of our favourite #makeforgood finds in our gift guide today.
Here, we’ve rounded up our top 20 meaningful gifts on Etsy. All handmade, all thoughtful, all very personal finds.
Ready to go shopping? Grab a coffee, sit back and use our interactive gift guide – just click on the links below to go straight to buy! You can’t go wrong.
Disclosure. We Are Scout partnered with Etsy.com for this post. We only partner with brands that are a good fit with our blog, our aesthetic and what you, our readers, enjoy. Content and concept, product selections, words and opinions are all our own.