Ready to go shopping? Grab a coffee, sit back and go shopping with our interactive guide – just click on the links below to go straight to buy! You can’t go wrong.
We’re publishing a new Christmas Gift Guide every day this week, so have a look at the other top presents we’ve found, and keep an eye out for more fresh and lovely gift ideas coming your way.
Shopping for tween or teen girls this Christmas? We understand. Before setting out on our global scouting trek to track down the best presents, we talked to lots of tween and teen girls to find out exactly what they’d like to find under the tree this year.
Here, we’ve rounded up the top 30 best gifts for tweens and teens that they’ll genuinely love – no fake ‘thank you’ smiles guaranteed! You might even get an OMG! All budgets and ages covered.
Top photo courtesy of Haute off the Rack.
Ready to go shopping? Grab a coffee, sit back and go shopping with our interactive guide – just click on the links below to go straight to buy! You can’t go wrong.
Want more Christmas present ideas? ‘Course you do!
We’re publishing a new Christmas Gift Guide every day this week, so have a look at the other top presents we’ve found, and keep an eye out for more fresh and lovely gift ideas coming your way.
We’ve done all the Christmas shopping for the favourite men in your life: Dad, grandpas, boyfriend, best mate, husband, son, brothers, uncles, nephews and teachers.
Some people think that shopping for blokes can be a bit tricky – so we’ve got you sorted with our top 30 gifts, sourced from around the globe. And pssst – it’s a sock-free zone (not that’s there’s anything wrong with socks, just make sure they’re good-‘uns!).
Ready to go shopping? Grab a coffee, sit back and go shopping for gifts for men with our interactive guide – just click on the links below to go straight to buy! You can’t go wrong.
Want more Christmas present ideas? ‘Course you do!
We’re publishing a new Christmas Gift Guide every day this week, so have a look at our other top present picks, and look out for more fresh and lovely gift ideas coming your way.
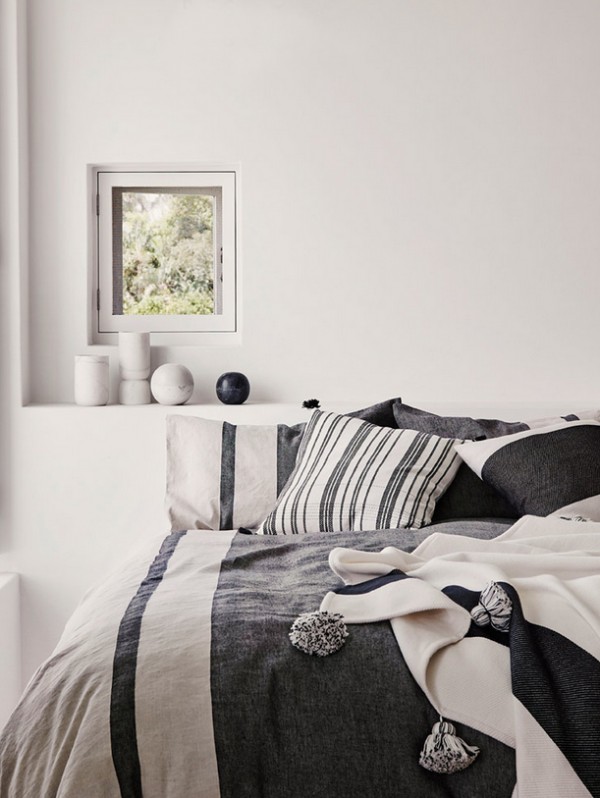
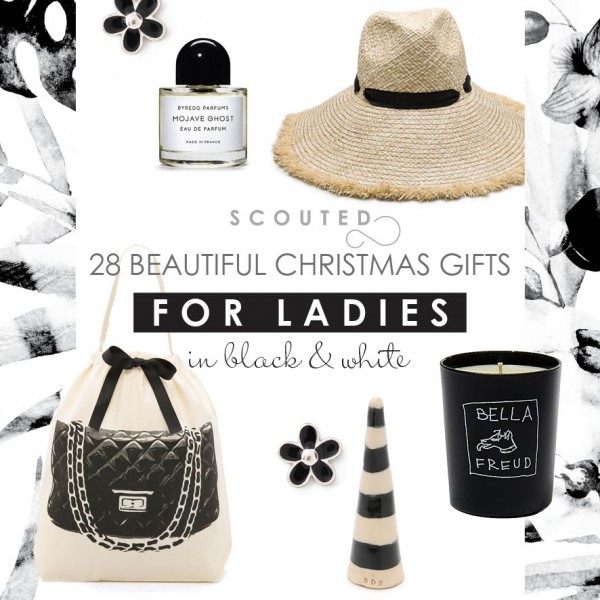
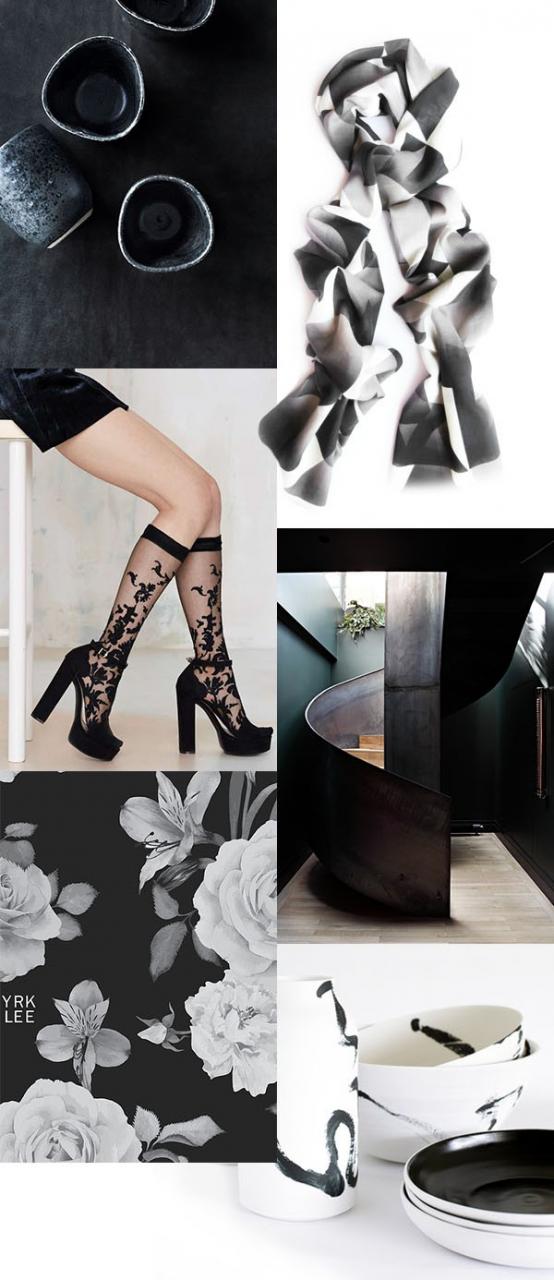
Shopping for gifts can get tricky when you’re considering colours – one person’s glorious fuschia can be another person’s ghastly fright. That’s why you can’t go wrong with neutrals, and one of the strongest looks we’ve seen this year is monochrome.
When it comes to making a style statement (and an easy present purchase), it’s all about black and white – from frocks and toasters to cushions and coasters.
We’ve scouted 30 gorgeous monochrome Christmas gifts for the favourite girls in your life. Grab a coffee, sit back and go shopping with our interactive guide – just click on the links below to go straight to buy! You can’t go wrong.
Have you been making a list? Checking it twice? We’ve rounded up 21 of the best Christmas gifts around the world for kids, so you better find out who’s been naughty or nice!
We’ve covered all budgets and all ages, with playful design and creativity in mind. Here, our top 21 kids Christmas presents.
Want more Christmas present ideas? We’re publishing a new Christmas Gift Guide every day this week, so look out for more fresh and lovely gift ideas coming your way, including kids.
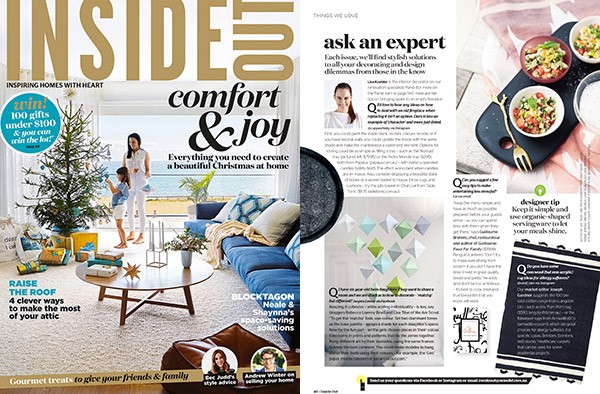
Have you seen the latest issue of Inside Out magazine? You can find us on the Ask an Expert page, replying to a reader’s interiors dilemma. This month, we offered a solution to a reader’s question on how to decorate her six-year-old twin daughters’ shared room so it’s ‘matchy but different’.
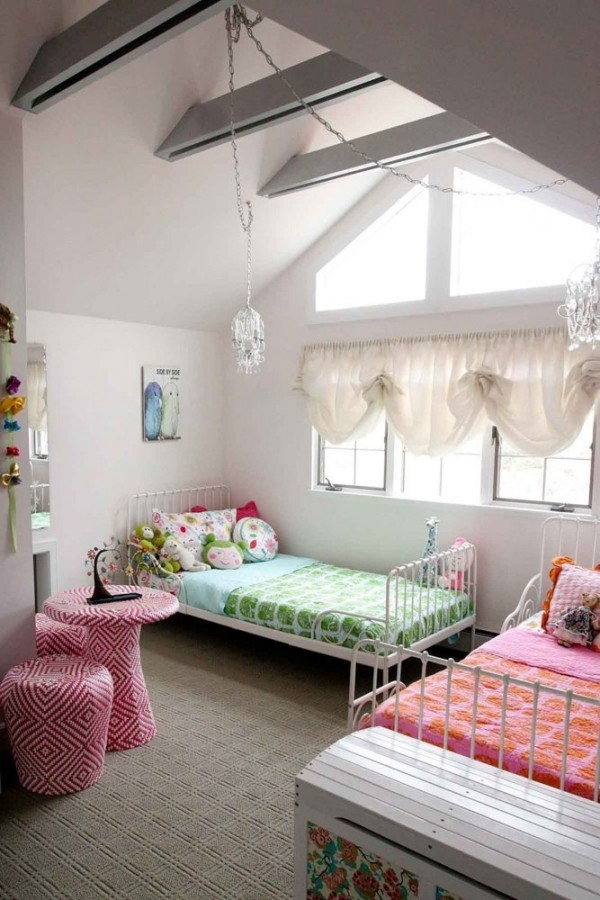
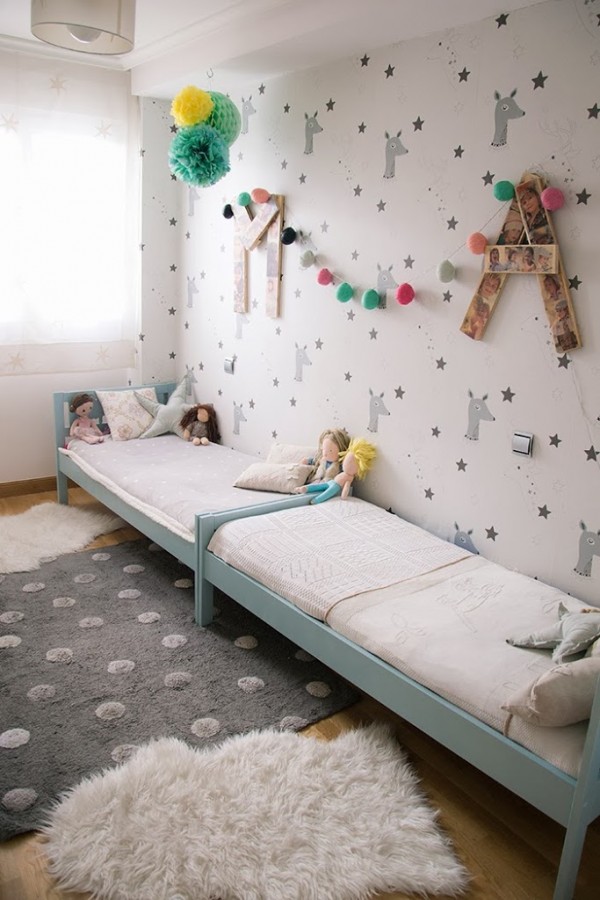
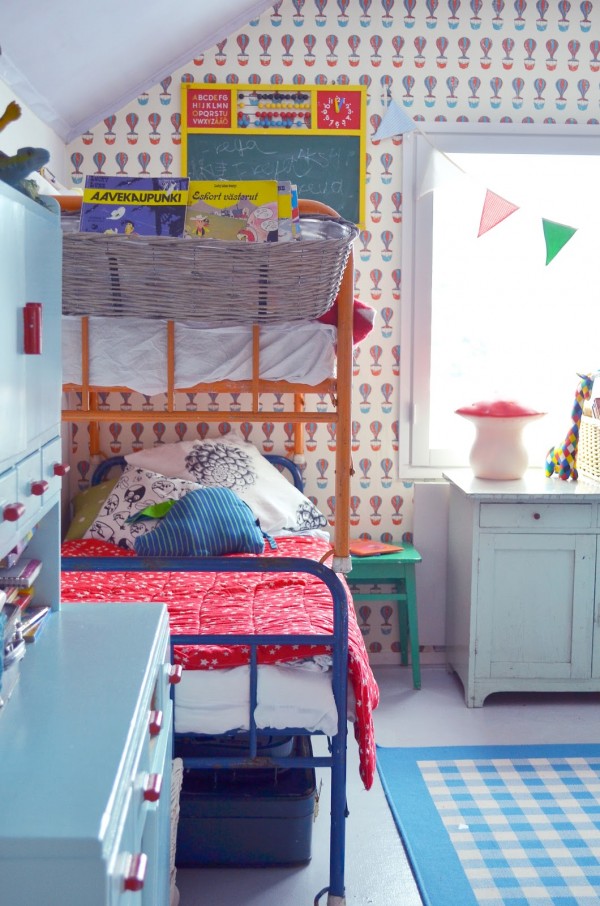
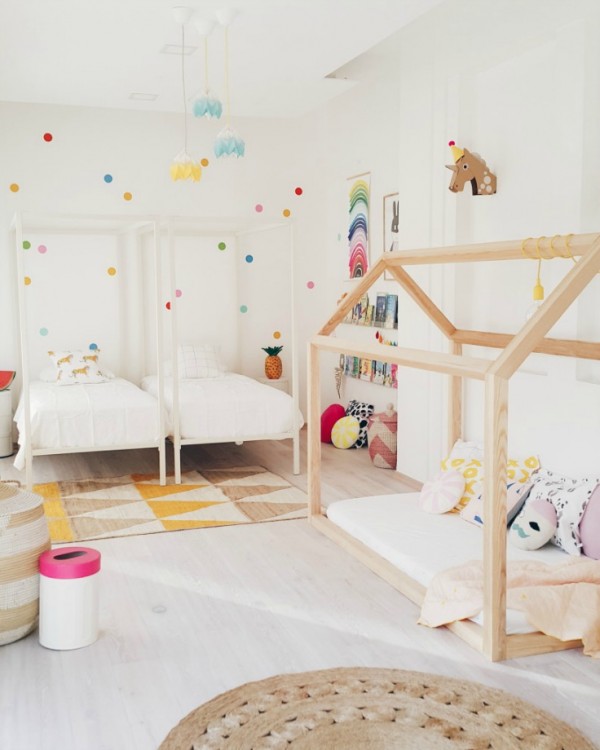
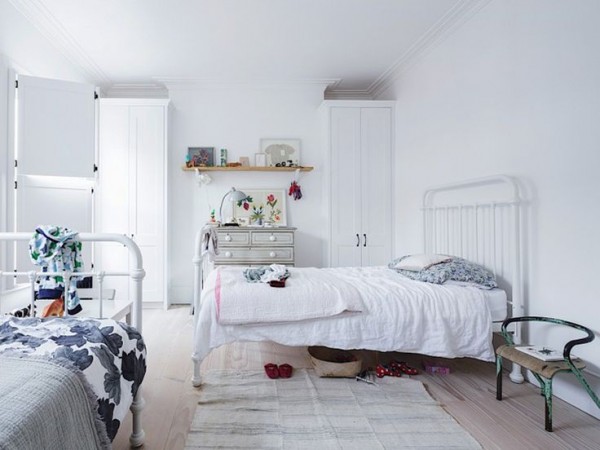
In the meantime, we’ve rounded up 10 of our favourite shared children’s bedrooms to inspire you, where each child’s space is well-defined yet co-ordinated.
Beautiful muted tones set the colour palette, while each girl’s custom-made initial distinguishes their space, via Hadas y Cuscus.
A mismatched, vintage look defines this shared kids’ room, with each bed decorated with co-ordinating yet different linen, via Anrinko.
A light and bright room for two, with a different print cushion defining each girl’s bed, via Live Loud Girl.
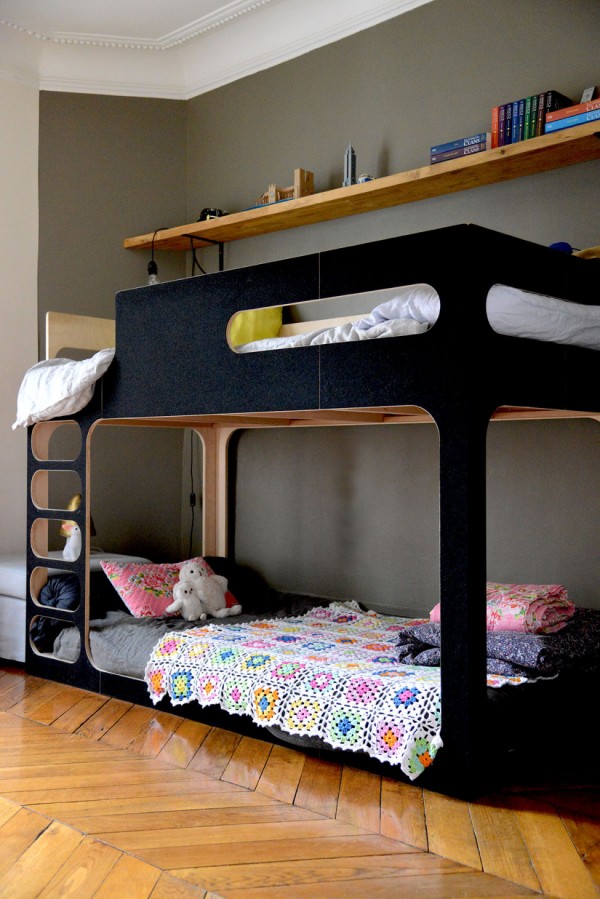
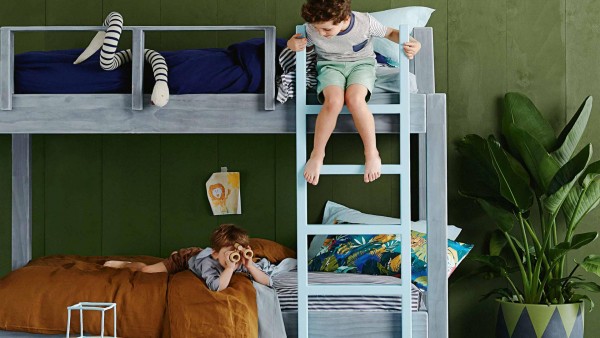
A matte black bunk bed makes a smart choice for a shared space, with the girl’s lower bed decorated with toys and a crochet quilt, while the boy’s upper bunk is decorated with his favourite colours, via vanessapouzet.
Minimalist and monochrome sets the scene, with the two children’s spaces defined with matching but different bed linen, via stilinspiration.
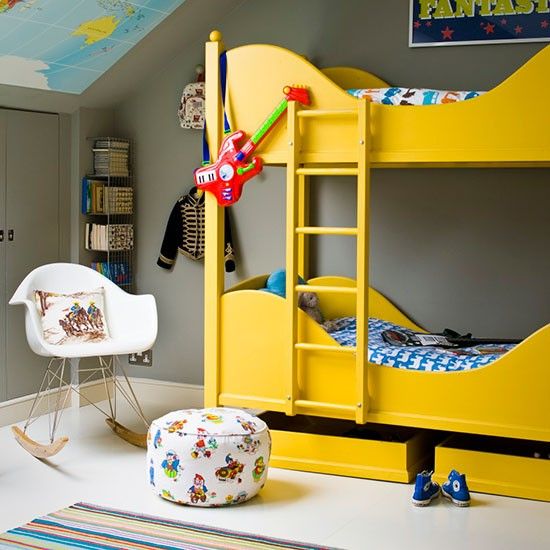
Room for two with a bright yellow bunk bed. The children have bed linen with different prints in matching tones, via House to Home.
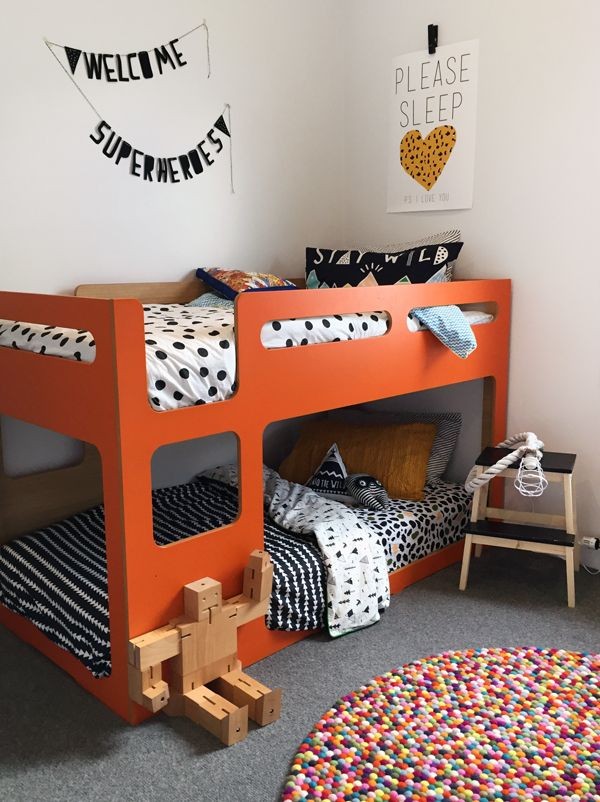
A bright orange bunk bed sets the scene for this bedroom for two little boys – with co-ordinated bedding from Cotton On in different prints. Click here to see the full house!
Jungle safari-themed kids’ room, with blue for the upper bunk and brown for the lower bunk, via Inside Out.
A light and bright boys’ room is defined by beds at right-angles, and different but co-ordinated bed linen, via Est magazine.
In this shared girls’ bedroom, each girl’s space and personality is defined by a similar handmade quilt in different colours, with matching toys and cushions, via Apartment Therapy.
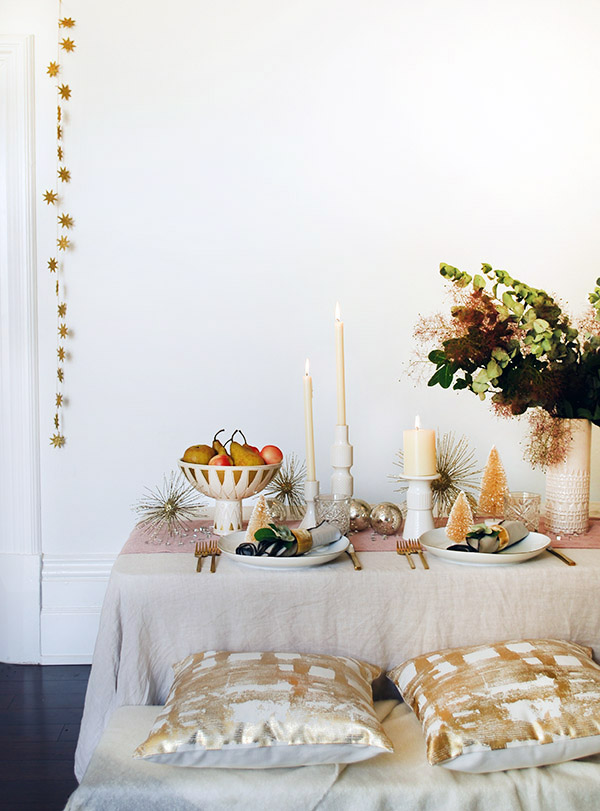
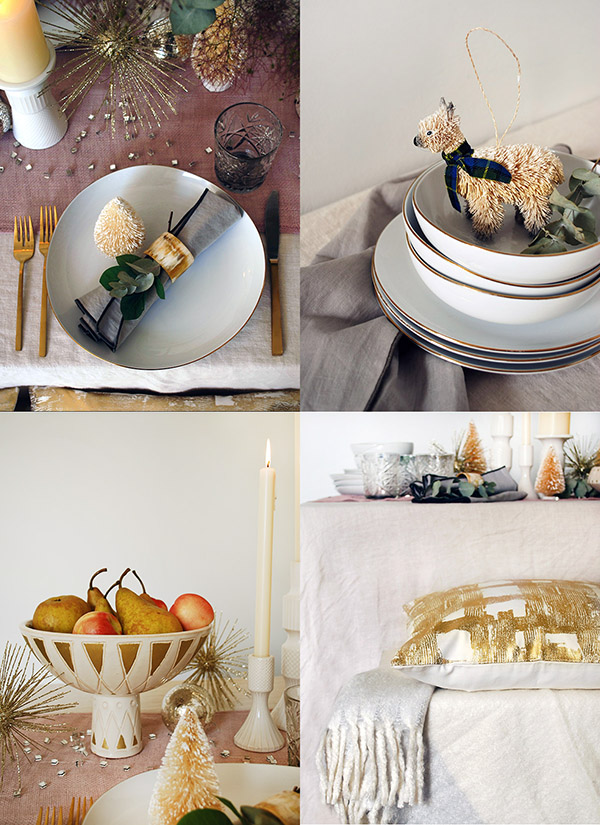
We love a beautifully decorated tablescape, and Christmas is the one time of the year when you can really have fun. Setting a gorgeous table will make your guests feel special, excited and embrace the holiday spirit.
We shopped at West Elm to create this Christmas table, and were inspired by their beautiful collection of Christmas baubles and mid-century inspired decor.
With the classic Christmas colour palette of cream and gold as our starting point, we’ll show you how we added colour, texture and tableware to create a fresh and festive new look.
What’s our theme? We’re calling it a mid-century inspired, rose-gold Christmas. Let’s get started.
1. Start by laying the table with a natural linen tablecloth. Note that it’s not a stark white tablecloth, as we wanted the base to look raw and natural.
2. Lay a dusky pink runner down the middle of the table to establish the next layer of colour. We used West Elm’s frayed net table runner.
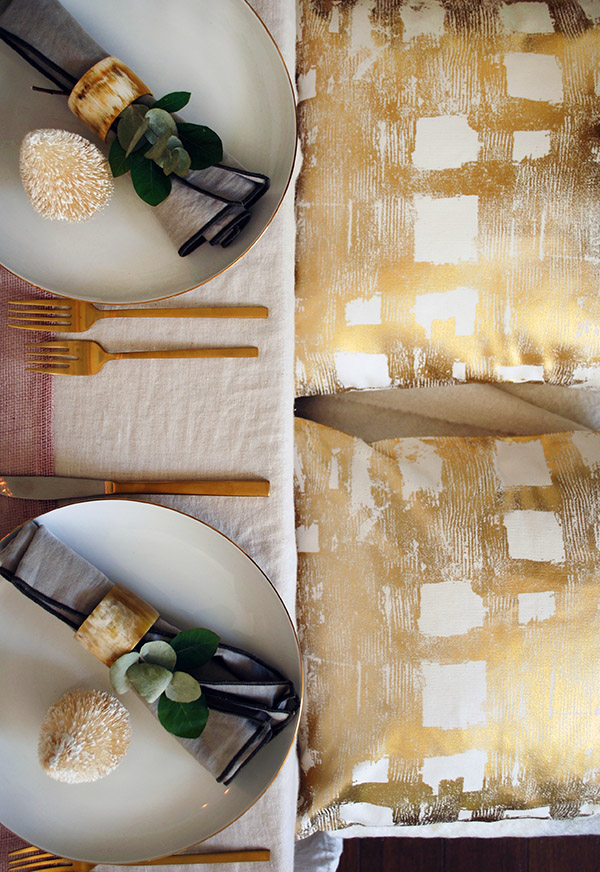
3. Set your table with white dinnerware. We chose West Elm’s metallic rimmed organic shaped dinnerwear, and accentuated the subtle gold rim with gold flatware. West Elm’s modernist-inspired gold cutlery is our favourite.
4. We could have gone with pink linen napkins, but it would have looked too… matchy and overtly feminine. Instead, we used the neutral border stitch napkin set, with bone napkin rings (available in store at West Elm) which have flecks of golden tones.
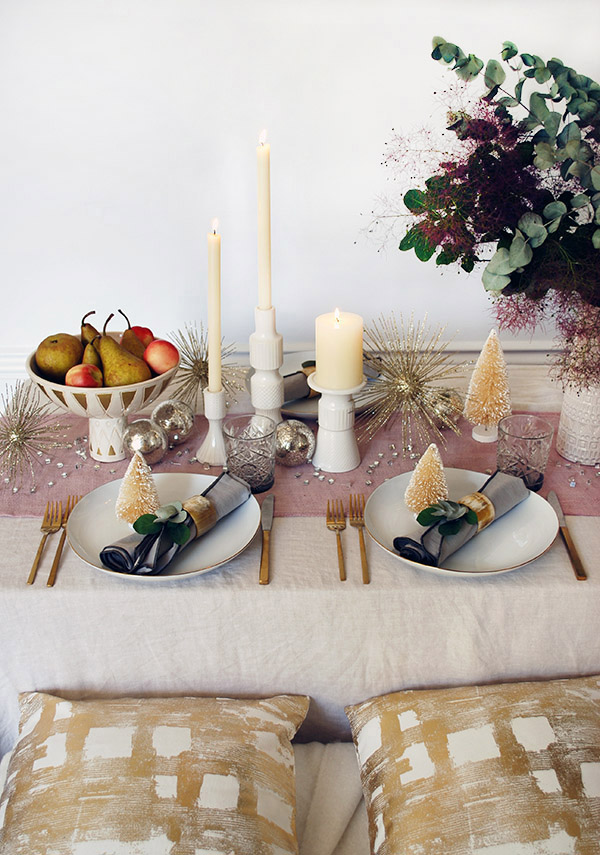
5. Add a playful festive note with a miniature bottle brush tree at each place setting. We love these brilliant Christmas decorations and they add a touch of vintage nostalgia to our table.
6. Reflect the golden gleam on the table with cushions on a bench seat. Soft and cosy for guests, the metallic brushstroke grid cushion enhances the gold elements on the table. Next, we added the cosy texture throw for extra softness and comfort.
8. Add sparkle to the table by scattering a selection of baubles and ornaments down the runner. We love the Sputnik-style glitter burst ornaments – a perfect nod to our subtle mid-century theme – as well as mercury ball ornaments and mirror garland (available in store at West Elm).
9. Create a mini forest of bottle brush trees down the runner of the table. We popped a playful llama ornament on top of a stack of plates. Your guests will love these thoughtful touches and fun details.
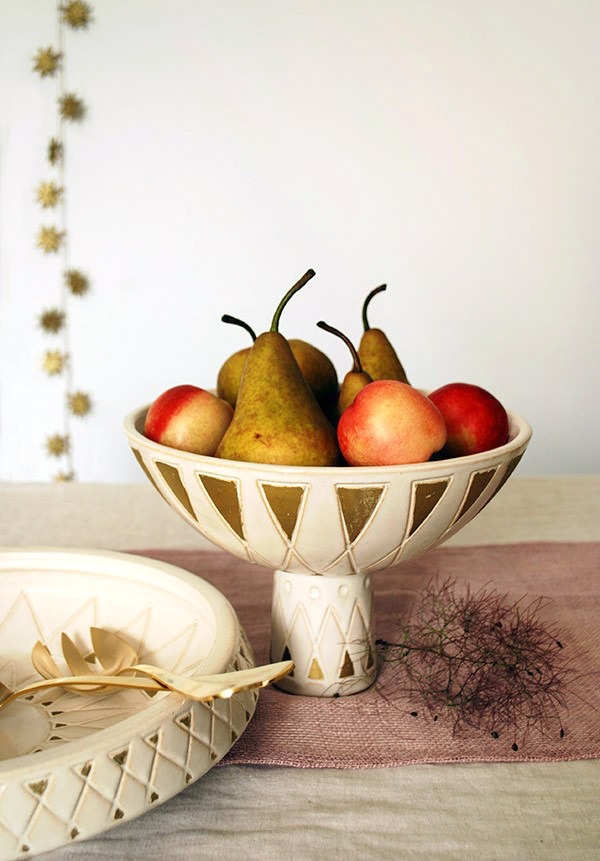
Fill your centerpiece with golden pears and rosy nectarines for a fresh element that ties in beautifully with the colours on the tabletop.
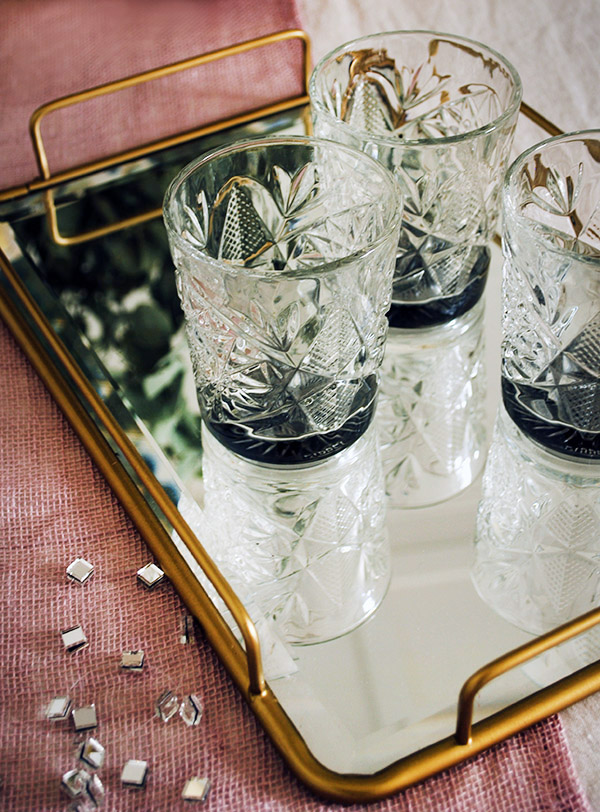
11. Serve your drinks on a mirror-topped tray for a dash of festive flair. West Elm’s Fishs Eddy brass mirror topped tray is available in store. For our glassware, we loved the cut-glass vintage appeal of the decorated hobstar glasses.
12. You can never have enough decorations. West Elm’s fluffy cream feather ball ornaments add an element of softness to our tabletop.
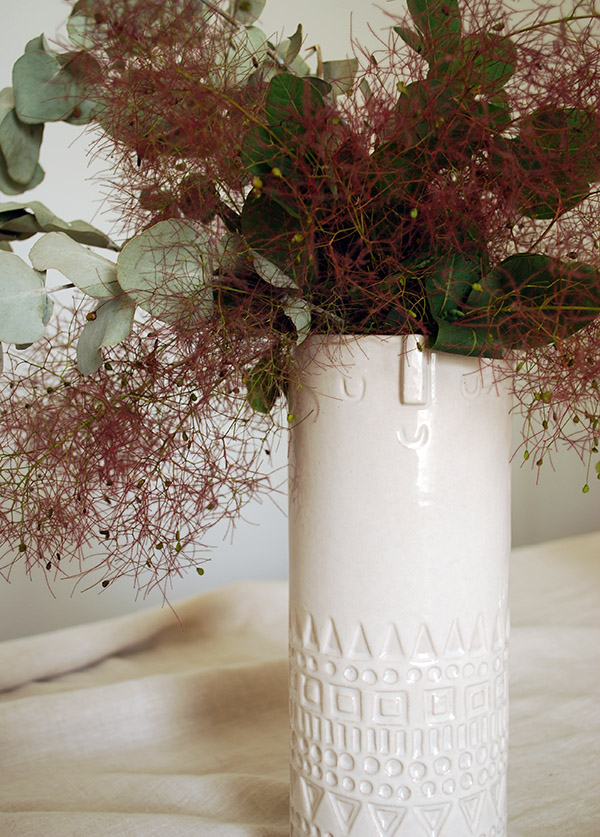
13. We created a beautiful centrepiece with a mid-century style vase. West Elm’s Atelier Stella vase is perfect, and we filled it with dusky pink smoke bush and eucalyptus leaves.
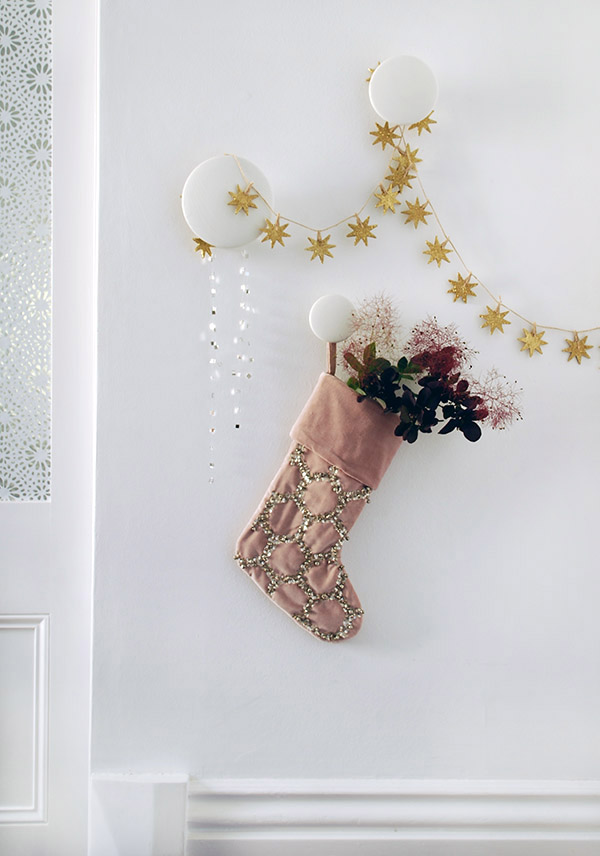
14. Add touches of your table’s theme throughout your home. We decorated our walls with the glitter craft gold star and mirror garlands and hung up the lush dusky pink jingle velvet stocking, which is embroidered with little bells. Gorgeous!
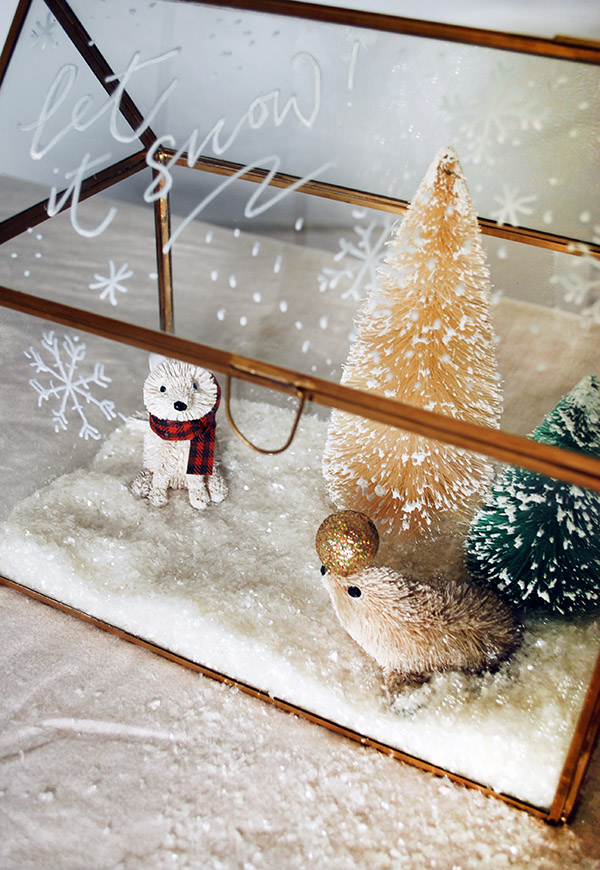
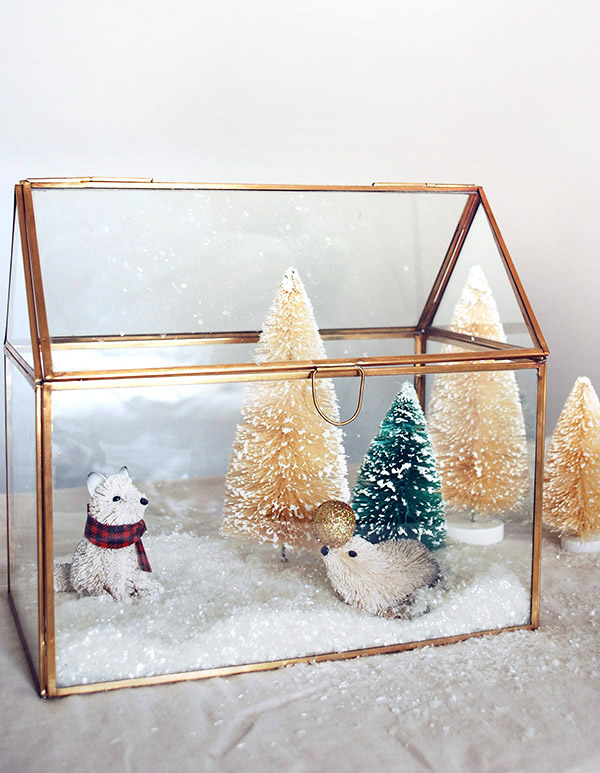
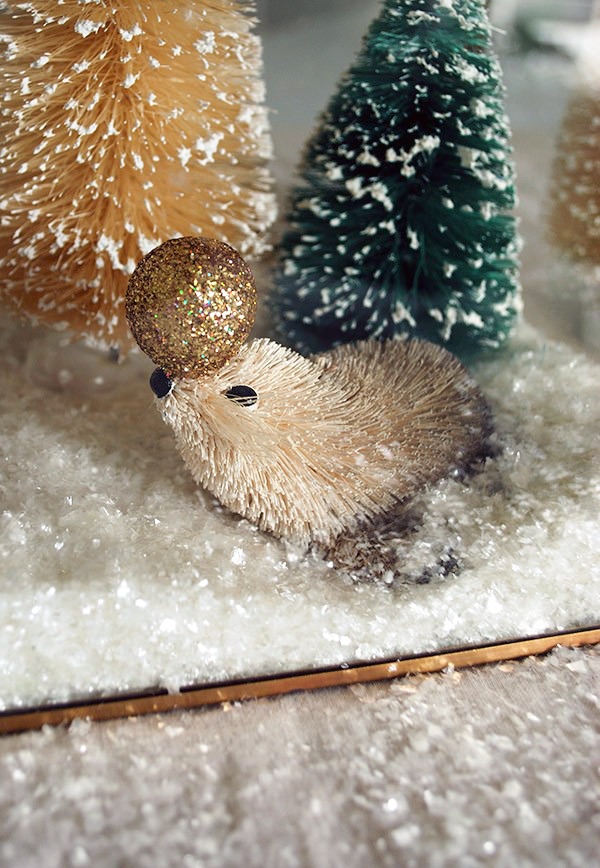
Create a personal festive message (which can be removed later) and more snowflakes with a Posca white paint pen.
This miniature winterscape would make a welcoming statement – and set your Christmas day theme – on top of a console table at your front door.
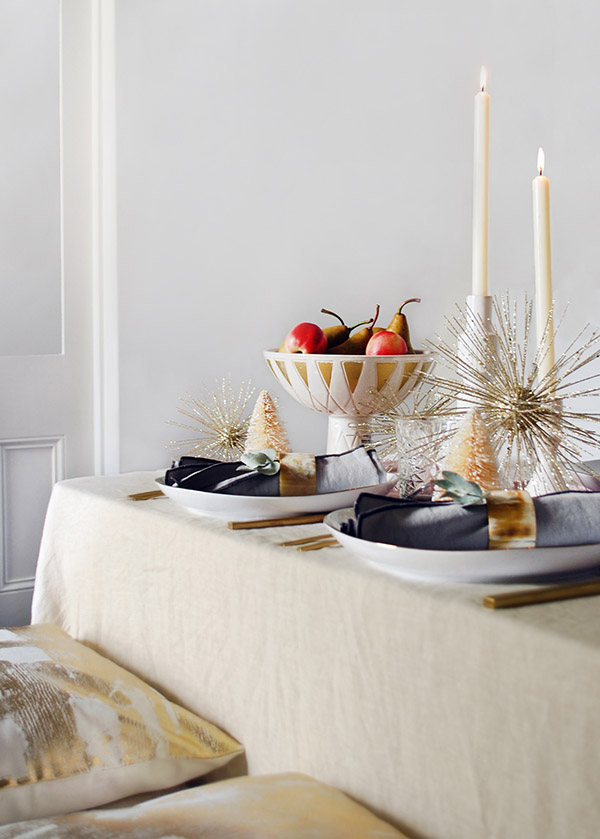
There are loads of ways you can add just a few extra pieces to your existing tableware for a totally new look for your Christmas table. Here are our top 5 ways to jazz up your table on a budget:
1. Upgrade your flatware. We love West Elm’s modernist-inspired gold cutlery sets. You can buy individual sets so you can cater for your crowd.
2. For at least one day of the year, bin the paper napkins and embrace linen napery for instant luxury. It’s easy to personalise a place setting with napery and napkin rings. We tucked in a piece of eucalyptus to tie in with our floral arrangement. You could also use ivy, holly or mistetoe.
3. Get a new table runner – it will add new colour and texture to your tabletop.
4. Invest in some new statement ornaments to give your table a Christmas theme. We love West Elm’s bottle brush trees.
5. Buy new glassware. Swap your glass tumblers for something special on Christmas day, like West Elm’s decorated hobster glassware.
Now your mid-century inspired, rosy-gold Christmas table is complete. Do you love it as much as you do?
Disclosure: This is a sponsored post in collaboration with West Elm. We only partner with brands that are a good fit with our blog, our aesthetic and what you, our readers, enjoy. Content and concept, product selections, words and opinions are all our own.
Tutorial by Lisa Tilse and Rebecca Lowrey Boyd. All photography and styling by Lisa Tilse for We Are Scout. This post was originally published on We Are Scout.
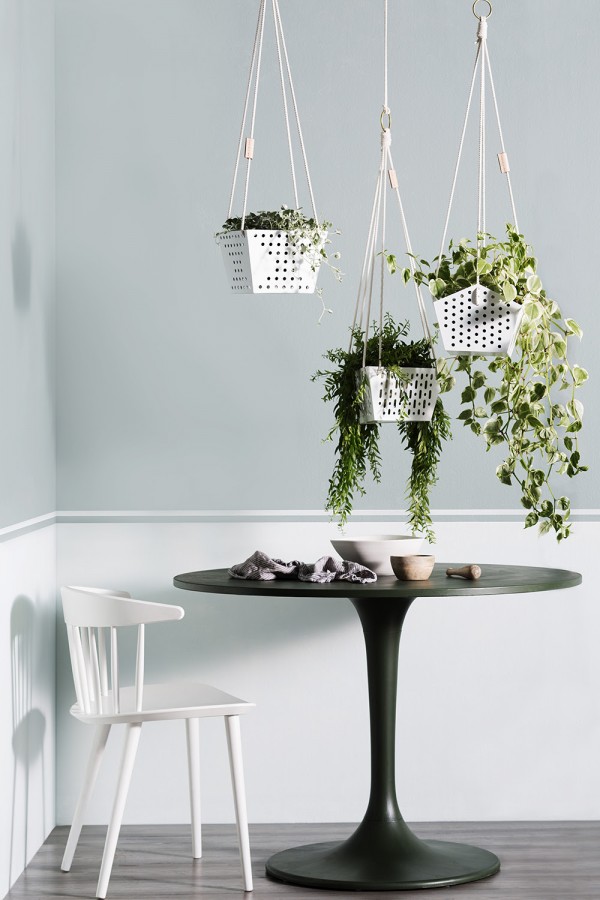
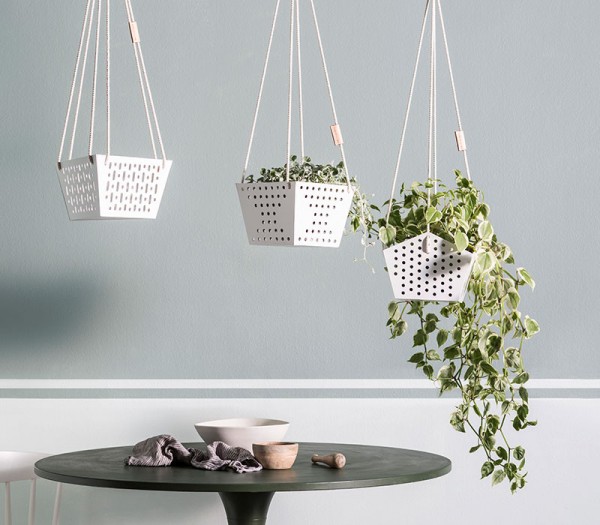
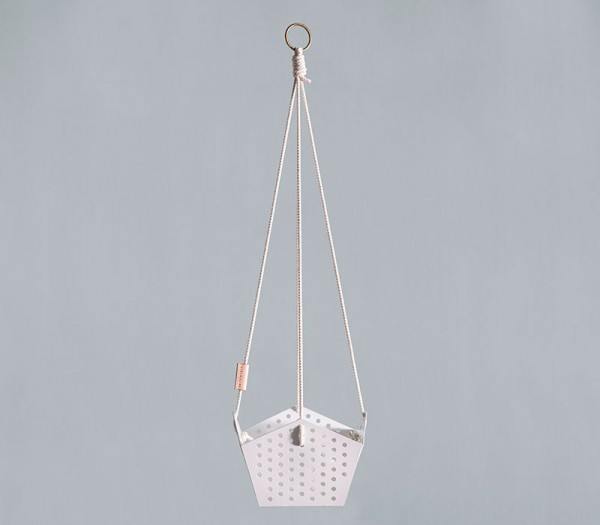
We’re always on the scout for a good planter, and Shelf/Life’s brand new Oslo ticks every box for what we consider a Very Good Planter Indeed. The new range of Oslo hanging planters are designed by husband and wife team Jess and Brendan Ibbett, the duo behind Sydney-based online store Shelf/Life.
“Shelf/Life was always intended to be a way to feature my own work amongst other great independent makers and designers”, says Jess.
“Now that we are solely online I have freed up time to focus on being creative again. With this renewed focus, The Oslo hanging planters are a new direction for SHELF/LIFE, as we get back to what we enjoy most”.
The new range of Oslo hanging planters include three designs, priced at $135, and feature locally-cut and powder-coated metal frames. The attention to superb handcrafted detail is evident in the design.
All of the metalwork was completed by hand by Brendan, and each piece is hand-assembled and finished with natural cotton rope, with a hand-stamped leather tag and hand-rolled brass ring by Jess.
The Oslo planter range includes three designs, and is available for pre-order from Shelf/Life now, for dispatch starting 16 Nov 2015. Just in time for Christmas!
Photography courtesy of Shelf/Life; styling by Vanessa Colyer Tay, photography by Sam McAdam Cooper.
The mighty return of indoor plants has emerged as one of the biggest interiors trends this year. We should know. We can’t get enough of them.
The other big trend that emerged this year via Instagram? Shelfies. Artfully-styled shelves that are less about the practicality of storing books and photos and more about the careful arrangement of special objets and mementos.
Put plants on shelves and you’ve got two hot trends and one sure-fire way to beautifully transform the walls of your home.
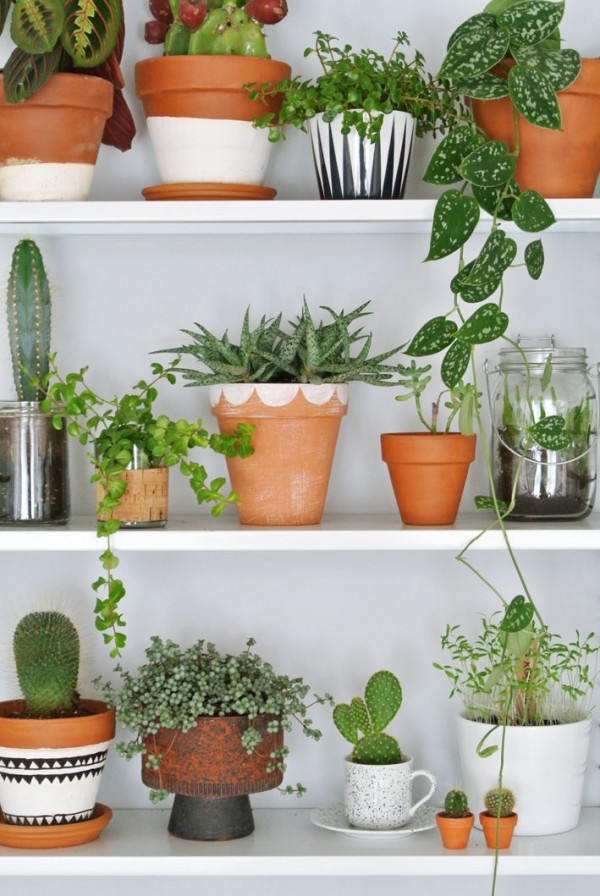
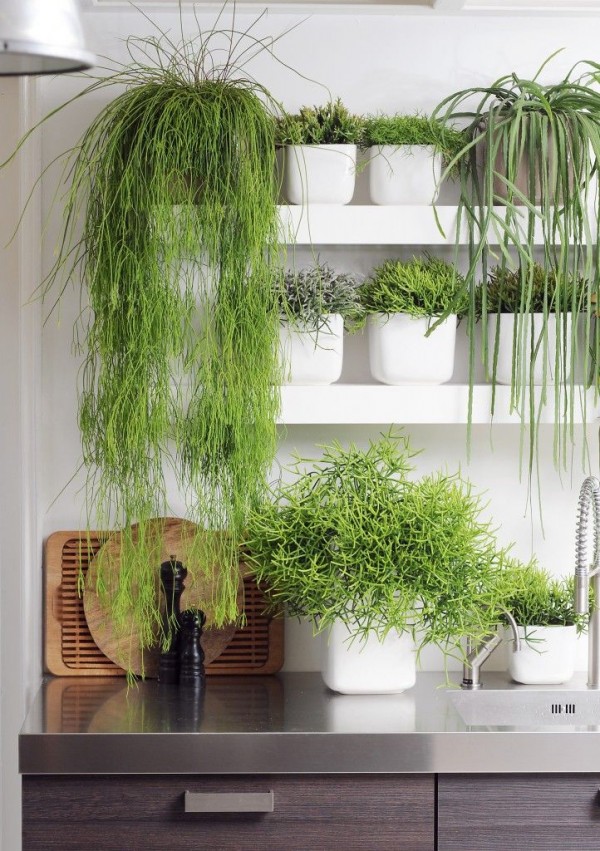
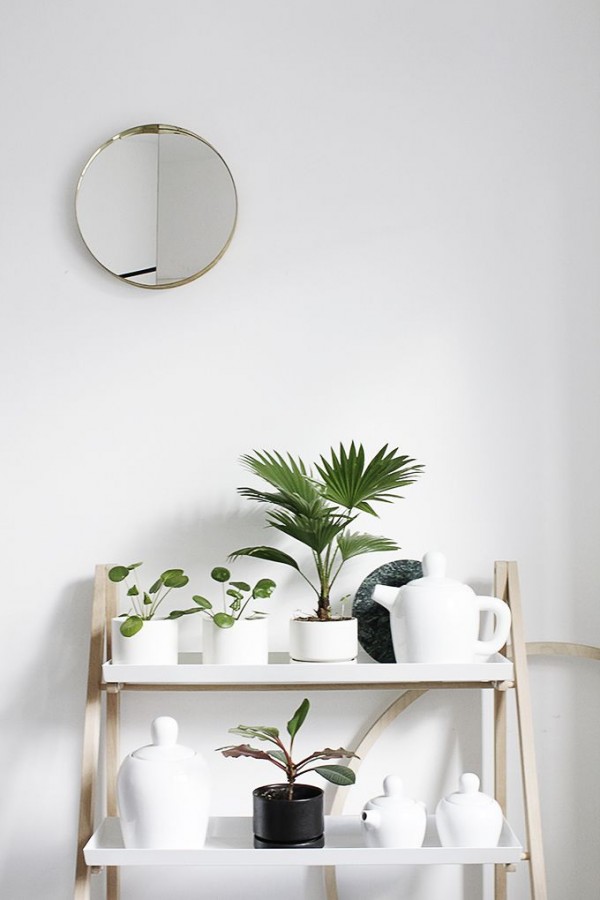
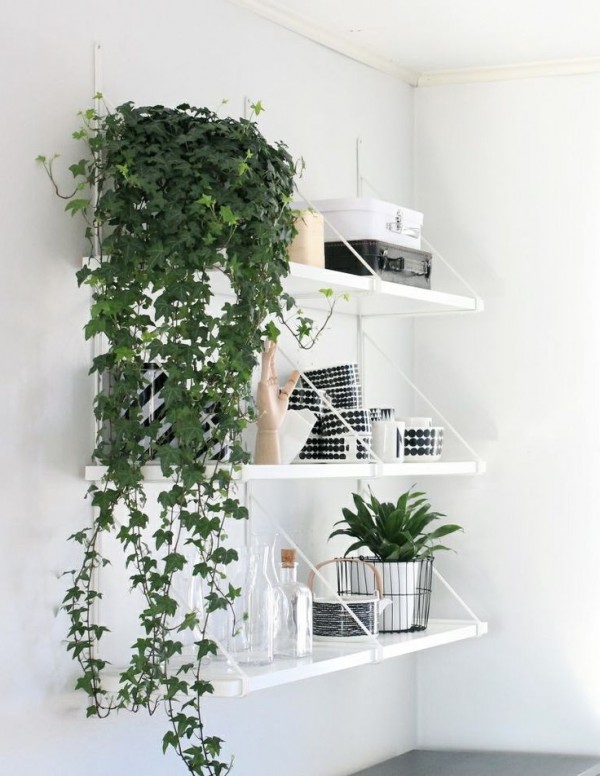
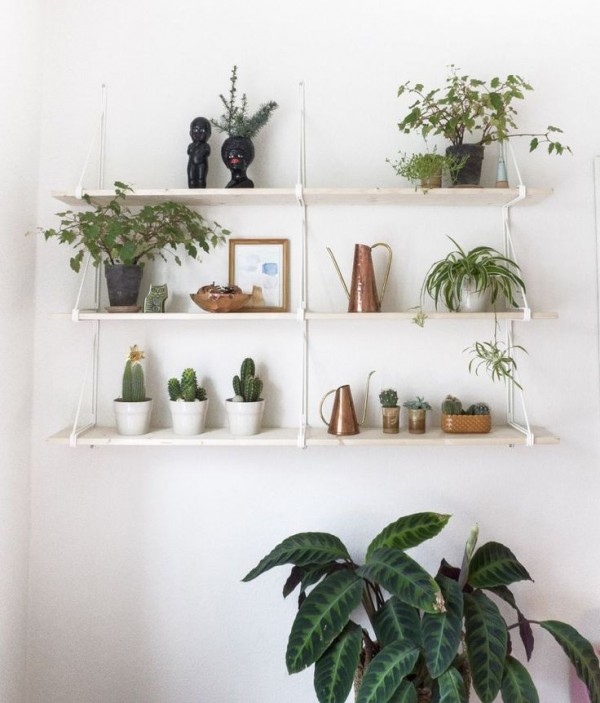
Here, we’ve rounded up nine amazing shelves that have been enhanced by lush greenery and potted beauty.
1. One of my favourite indoor plants, rhipsalis, makes a stunning appeance in this kitchen, alongside some other trailing beauties. Without this carefully considered green wall, courtesy of two floating shelves installed above the sink, this kitchen would look cold and sterile with its stainless steel benchtop and dark timber cabinetry.
2. The new purpose-built ladder shelf has popped up as a trend of its own this year, thanks to its Scandi-inspired form and super-practical function. Perfect for small spaces and odd corners that need an instant lift. Styled with monochrome ceramics and planters, the four potplants add texture and bring this little vignette to life.
3. Looking to make a statement in your home? Wallpaper with a strong pattern isn’t for style wusses – this look requires bravery and a great collection of mid-century ceramics and planters. Take inspiration from the rather magnificent cactus, which adds a strong graphic dimension positioned next to the floating shelves.
4. Monochrome decor, white shelves and a touch of natural timber is a winning combo in many Scandi-inspired vignettes. Add a trailing ivy plant on the top shelf, and balance with a smaller, more compact plant on the opposite side on the bottom shelf. Perfect.
5. What’s not to love about mid-century sideboards, timber floorboards, and a curious ginger cat (can you spot shy white kitty too? It’s a bit Where’s Wally.) Add a string-system inspired shelf and you’ve got loads of surfaces to display your urban plant jungle. The vintage terracotta pots and planters pick up the warmth in the sideboard and timber floors, while the greenery adds that vibrant colour contrast and textural interest. Just fab.
6. Here we see copper and metallic vessels working side-by-side a mix of black and white ceramic pots and objets. Mix tiny singular pots of cacti with larger plants for the perfect balance. And pop a big leafy plant at the base to anchor your new green wall.
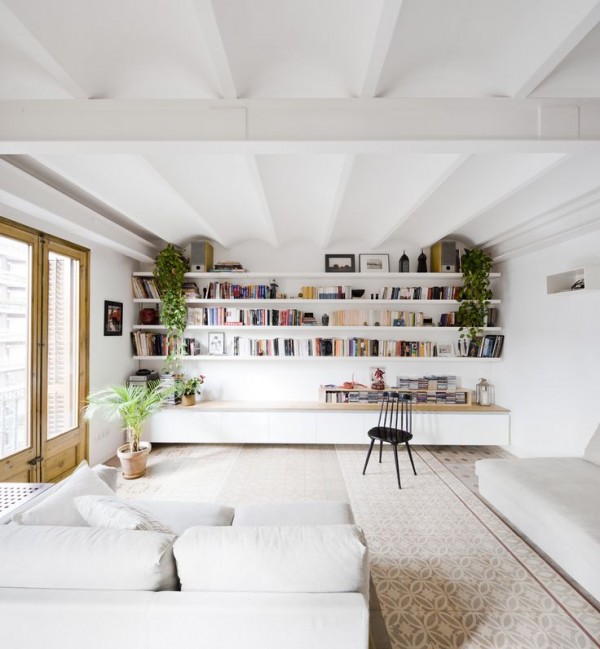
7. Bookshelf perfection. In this library-living room, custom-made shelving and cabinetry makes an impact stretched across an entire wall. Books are the main player here, but a couple of trailing plants on either side of the wall break up the horizontal lines and brings the outside in.
8. Transform your work space into a lush urban jungle. Here, a couple of plants add trailing greenery to the wall-mounted shelves (a gorgeous string of pearls plant works hard in this spot), while a vignette of greenery at the base enhances the look of a vertical garden. Note how the clever use of a framed artwork – of a fur tree – extends the greenery theme without an actual living plant.
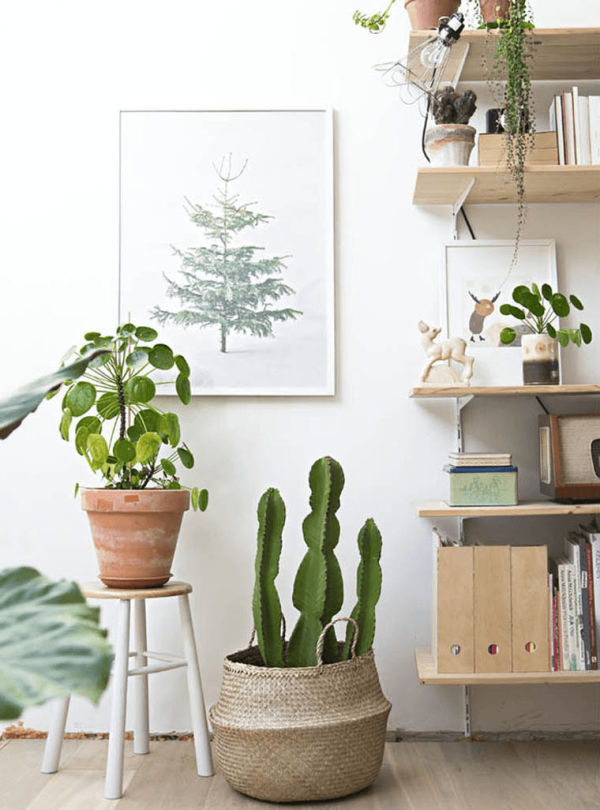
9. Here we see terracotta pots and planters in golden tones enhance the warm tones of timber. The use of natural woven baskets adds that much-needed textural detail, while a painting on the top shelf sets the scene for an indoor living landscape.
If you love the idea of adding a touch of theatre when you’re throwing a party – like a special birthday, engagement, or baby shower – but can’t afford expensive decorators or florist-created arrangements, it’s easier than you think to DIY.
We created this gorgeous hanging flower chandelier from scratch in an afternoon for a statement centrepiece that looks incredible – and smells heavenly.
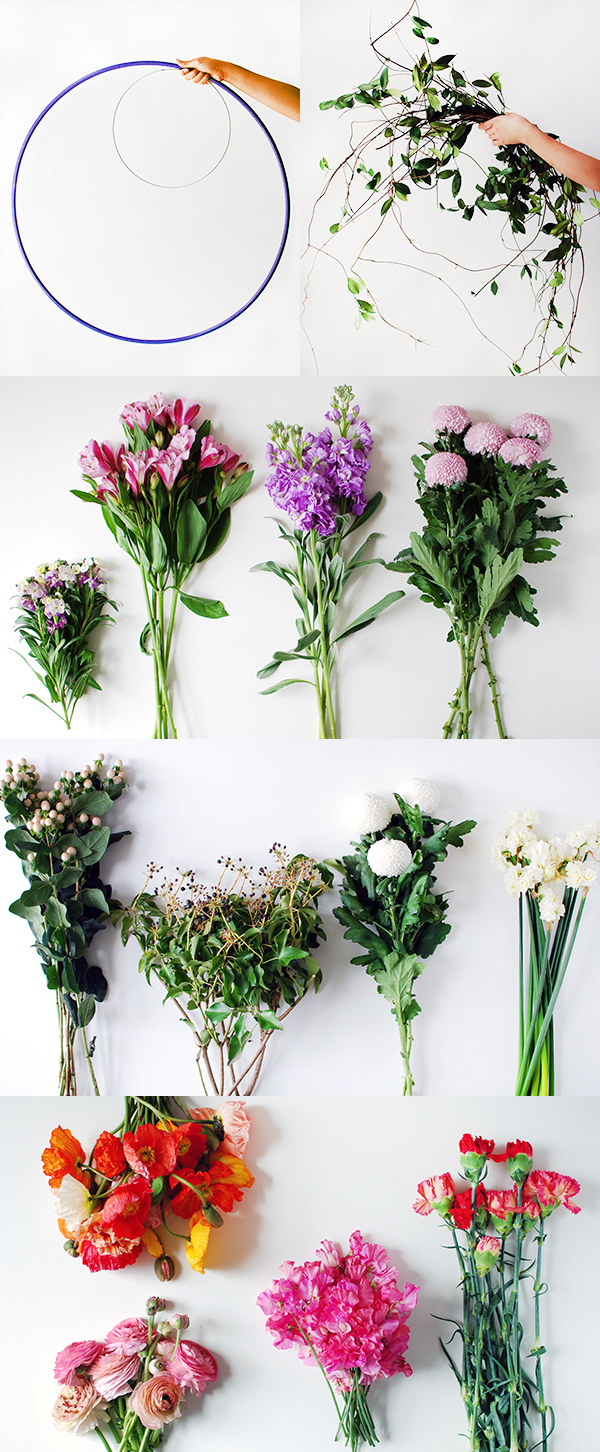
Materials
Hoola hoop
Green paint for the hoola hoop (if you can’t get a green one)
Wire hoop with 30cm diameter – we found ours at Spotlight
Fishing line
Green washi tape or florist tape
Green florist wire
Scissors
Lengths of fresh jasmine vine
Lots of fresh flowers – pick anything in season. We used an assortment of spring blooms including poppies, ranunculus, carnations, sweet peas, chrysanthemums, pink snowberries and wall flowers.
Let’s get started
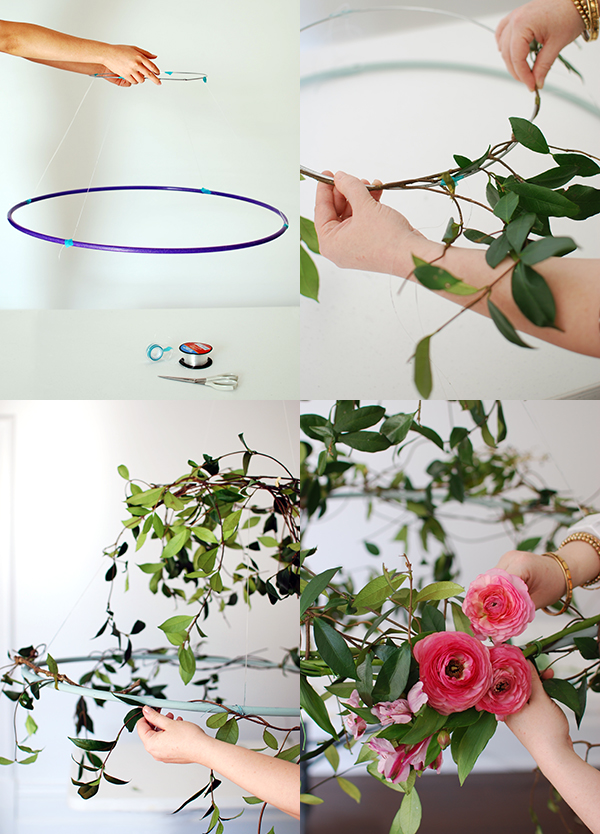
Assemble the structure
1. If you need to paint the hoola hoop, you should do this first. We left it until we’d joined the two hoops together, and it was a bit tricky.
2. Attach the two hoops together with four pieces of fishing line evenly spaced around the diameter. The hoops should be about 40cm apart.
3. Secure the fishing line to the hoops with tape.
Add the vines and flowers
1. Start by attaching the lengths of jasmine vine to the wire ring, before moving to the hoola hoop. Wind each piece over and under the ring as you go around, letting the tendrils hang down. Allow the two ends of the vine pieces to hang down as well, and just secure small sections of the vine to the wire with floristry or green washi tape. Tape pieces sparingly and try to work with the curves of the vine for a natural look.
2. Don’t add any flowers to the top wire ring, so build up the pieces of vine to make it slightly more dense. Make sure there are lots of hanging pieces that just about reach the bottom hoop, so that there isn’t a big empty space between the top and bottom parts of the chandelier.
3. Add the flowers to the bottom hoola hoop one at a time, securing them by poking the stems between the vines and the hoop. Use small pieces of tape and florist wire where needed.
Start by grouping three or so of the same flowers together, then add small clusters of flowers either side of the first group.
4. Leave a gap of about 30cm and cluster another group of flowers. Repeat until you have made groupings with the same space between them all the way around the hoop.
5. Now you can begin to fill in the gaps with small flower groups and individual blooms. Add hanging pieces of vine as needed. The aim is to make a natural-looking hanging garden that tumbles down from the chandelier.
As you’re adding the flowers, keep stepping back so that you can get a good overview of how the chandelier is coming together and where the empty spots are.
6. Consider the balance of colour as well as the size and shape of the flowers when you’re placing them.
That’s it – your beautiful hanging floral chandelier is complete!
Give it a light misting with water, and another misting just before guests arrive. Keep it out of direct sunlight so your flowers don’t wilt before the party starts.
Hang the chandelier over the party table for a stunning centrepiece. You can use a temporary or permanent hook in the ceiling, and suspend with fishing line, or hang from any exposed beams.
Tutorial by Lisa Tilse and Rebecca Lowrey Boyd. All photography and styling by Lisa Tilse for We Are Scout.
This post was originally published on We Are Scout.
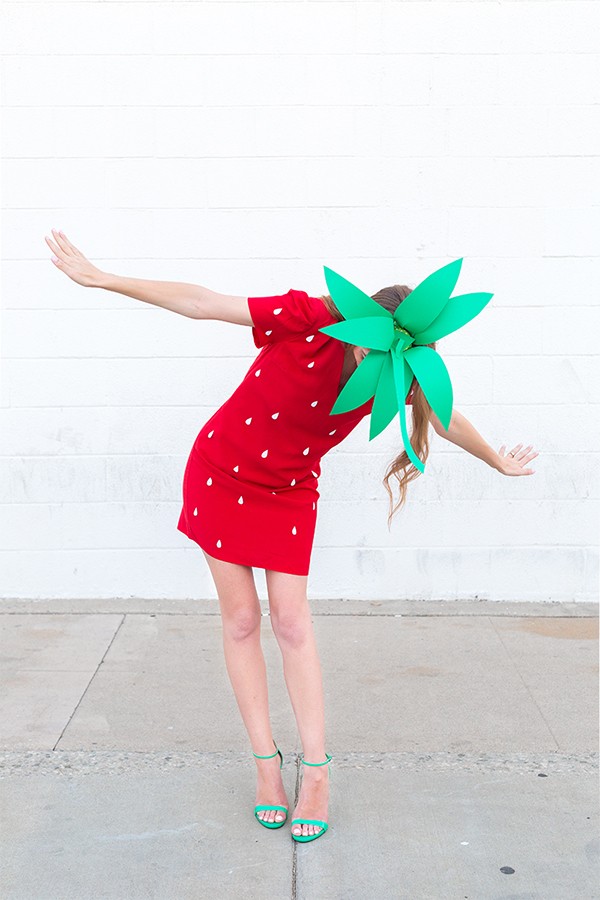
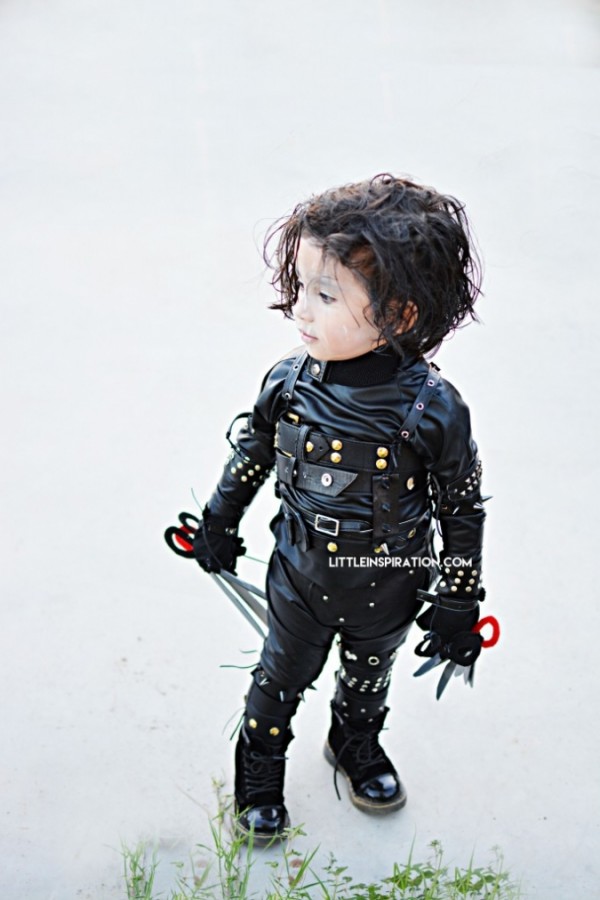
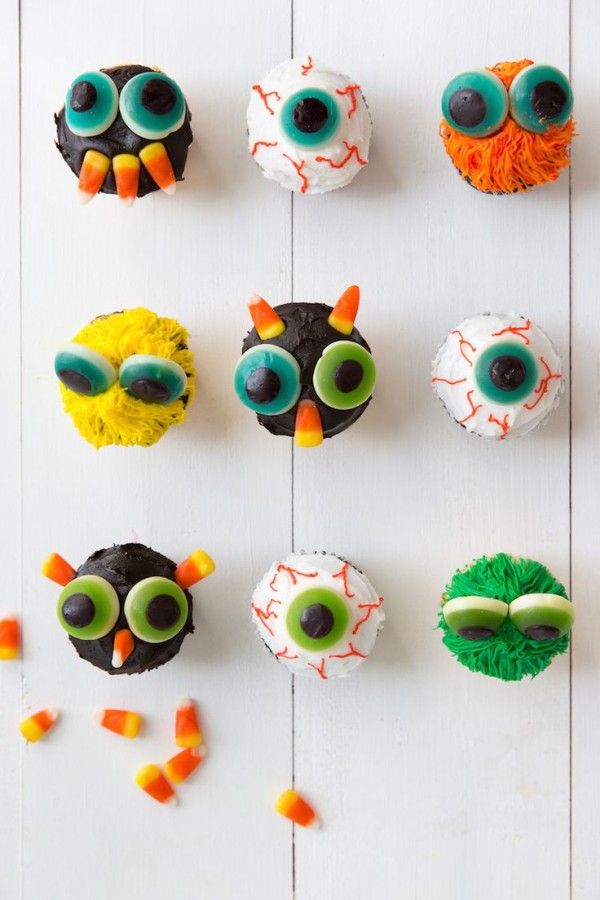
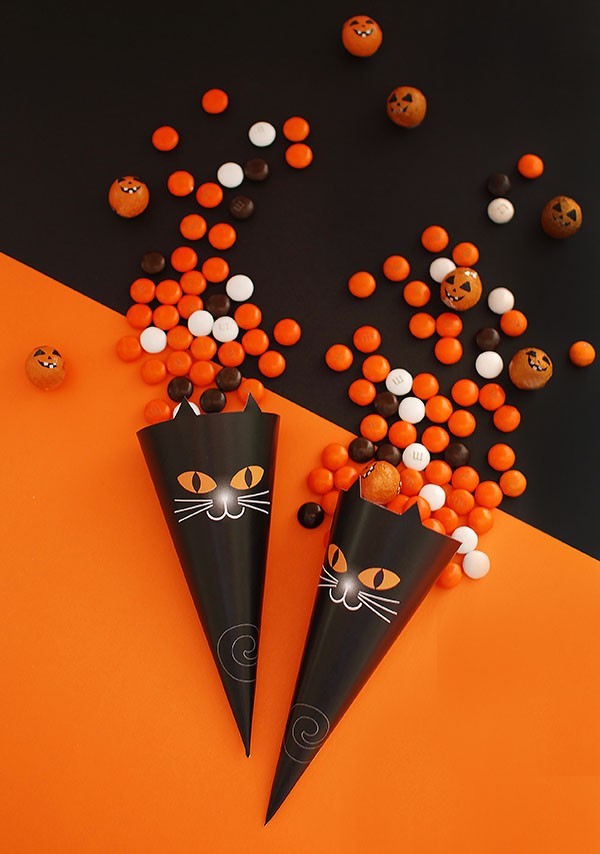
Need some last-minute ideas and inspiration for Halloween? Welcome to our ultimate round-up. We’ve got everything you need – from printables for trick-or-treat cones, to Halloween cup-cakes, easy decoration ideas and last-minute costumes you can hobble together in a jiffy.
Orange and black not your thing? Embrace a monochrome palette for Halloween and make a stylishly spooky statement, inspired by our favourite looks in fashion, design and interiors – from the 1960s til now. Click here for more.
With Halloween on Saturday night, we’ve had a little fun pulling together our own style interpretation of a Halloween theme: black and white.
The monochrome look has trended across fashion, design and interiors this year, from black and white children’s bedrooms to black and white ceramics, artworks and even kitchen design.
Here, our favourite black and white looks – from the ’60s to now – to inspire you for your Halloween style this year – and there’s not a pumpkin or candy corn in sight.
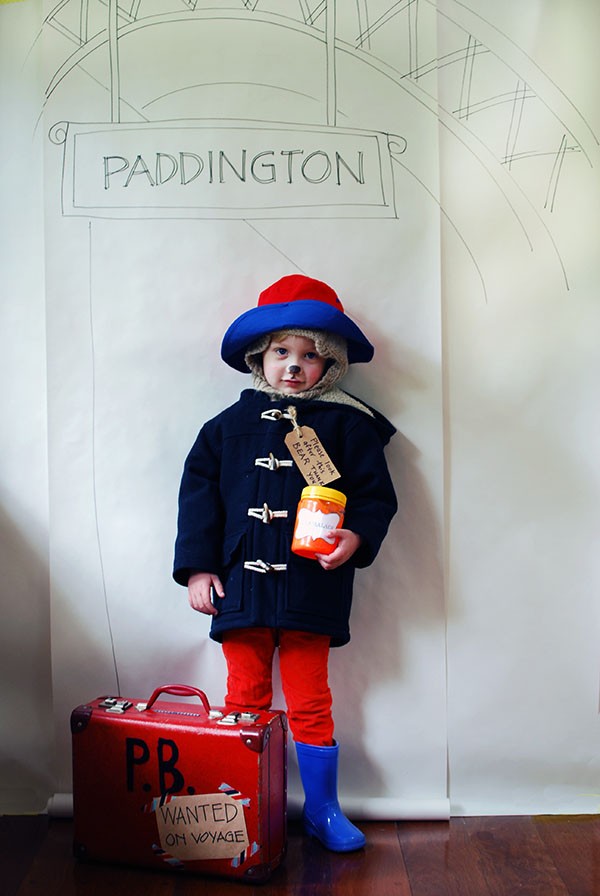
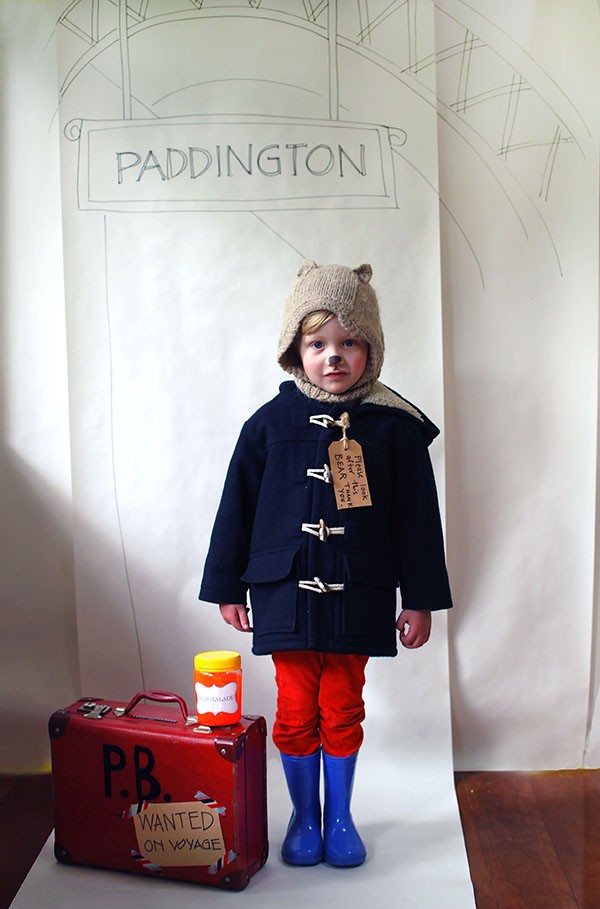
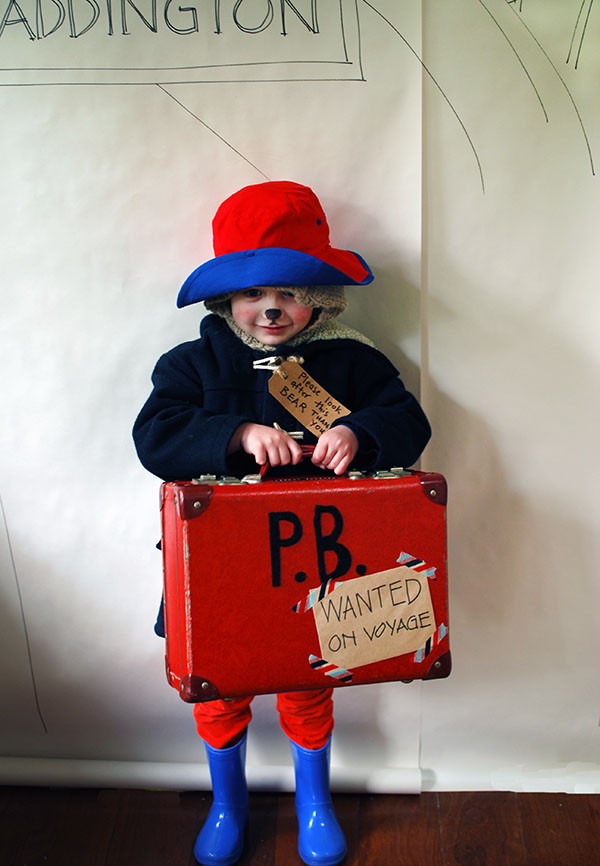
Need a last-minute costume for your child in time for Halloween? We’ve got it sorted with our no-sew DIY Paddington bear. It’s beary easy to pull together with stuff you’ve already got at home – and it’s also beary cute.
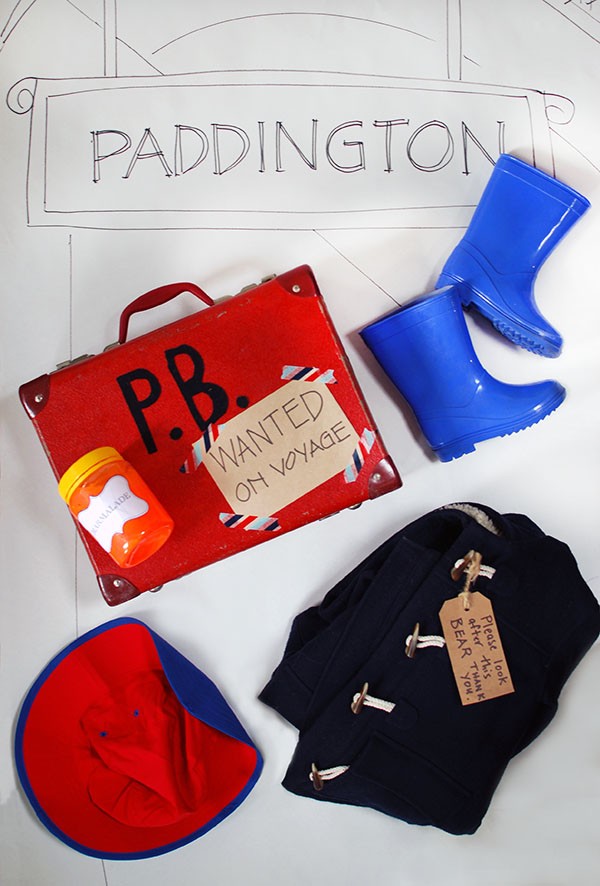
What You’ll Need
You can easily put together a great Padddington outfit with things you already have in your wardrobe.
The essentials are:
1. A navy blue duffle coat with a hood is Paddington’s signature look. But you could make do with any blue coat.
2. A soft wide-brimmed hat in red or black . The original Paddington bear had a black hat, but in more recent incarnations he wears a red hat. I found a two-tone red and blue hat, and turned it up at the front with a couple of stitches (but a safety pin would also work).
3. Wellington boots. Paddington traditionally wears red wellies but we made do with Harry’s blue gumboots. Try to keep to Paddington’s traditional colours of red and blue.
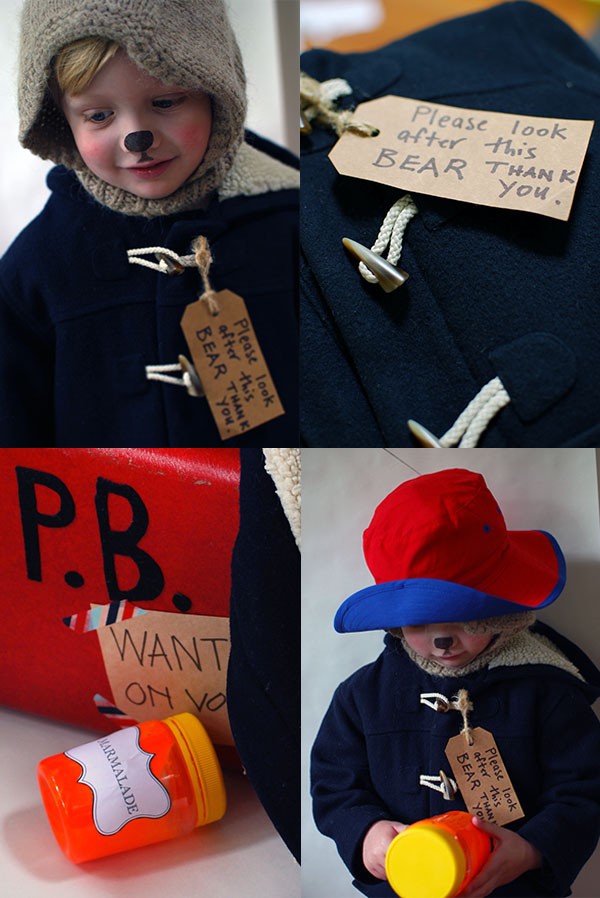
4. A ‘Please look after this bear’ luggage tag. Use a piece of kraft card or a ready-made cardboard luggage tag and use a black texta and your very best bear hand-writing. Don’t forget ‘Thank you’! Tie it to Paddington’s top toggle.
5. A suitcase. Paddington’s suitcase is traditionally brown, with his initials ‘PB’ handwritten in black on one side. I used my old red school case from the ’70s for an authentic look, but I used sticky-back felt to cut out the intials so I didn’t mark the case. You should also attach a hand-written transport notice, ‘WANTED ON VOYAGE’.
6. Marmalade! What’s Paddington without a jar of his most favourite condiment? Rather than lumping my four-year-old with a heavy glass jar of the real stuff, I made a child-friendly prop with an old-school label stuck on the outside of a clean plastic peanut butter jar.
Then I grabbed a paintbrush and swirled some orange paint around the inside of the jar to imitate the look of marmalade. Alternative prop: marmalade sandwiches (although marmalade not tolerated by this four-year-old bear).
7. A cute black nose. Use black face paint (or at a pinch, your black eyeliner) to draw on a cute little v-shaped button nose. You can also draw on an upside-down Y underneath the nose for that beary cute look.
Depending on your climate, you might want to dress Paddington in a brown sweater and brown pants or cosy tights – or none at all! We only had a pair of bright red cord pants which worked with Paddington’s traditional colours.
An op-shop find of a cute furry bear-eared hat added a touch of authenticity to Paddington’s beary look.
What do you think? Good last-minute costume option? You might like to try a grown-up Paddington costume. Want to make it spooky? Cover Paddington in spiderwebs, bats and spiders. Or what about a zombie Paddington? (Poor walking dead Paddington – sacrilege! But I’d still love to see it. Maybe.)
Want more DIY Halloween inspiration and printables?


 $19 - Uniqlo")


 $69.57 from Amazon.")